TWLogAIAN User Guide
A powerful log analysis tool with AI assistance

Log Analysis Flow
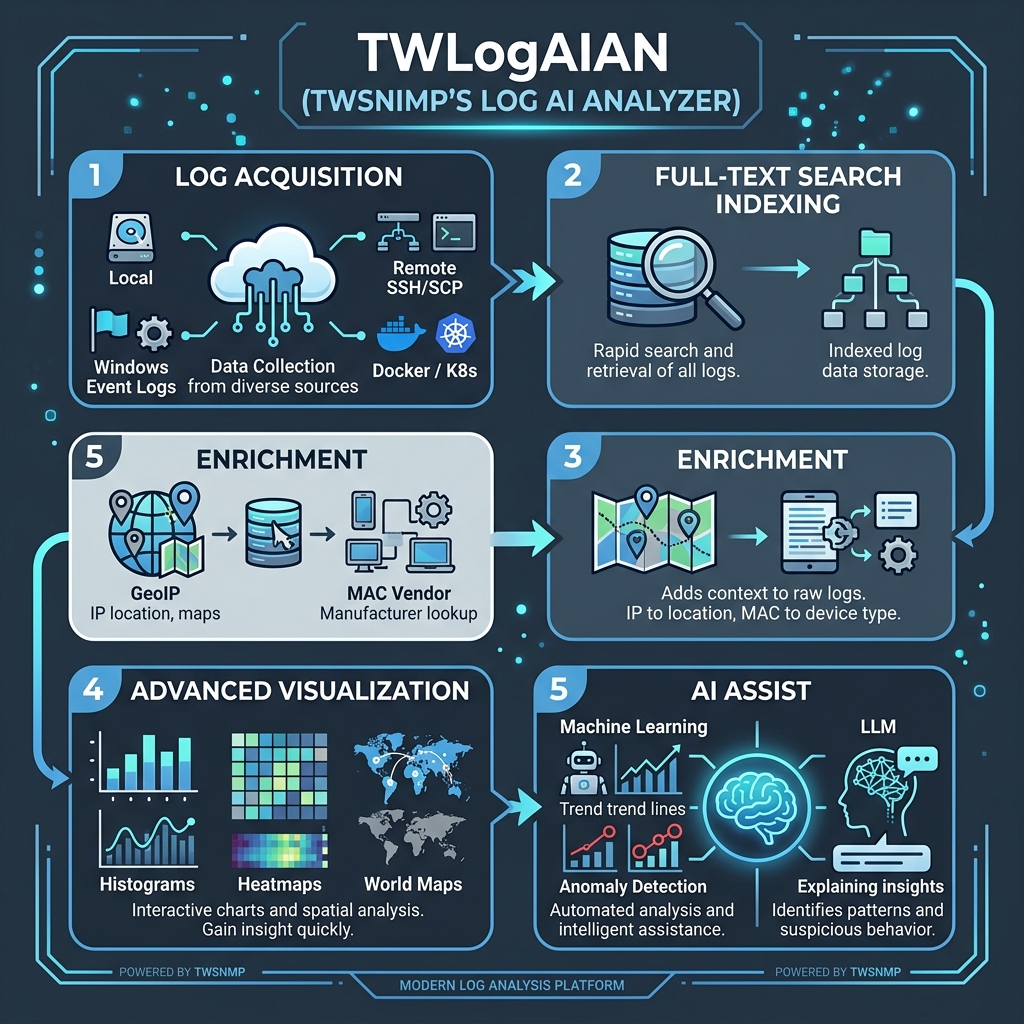
Why TWLogAIAN is Being Developed
Development on TWLogAIAN started on New Year’s Day, 2022. It is designed to be: “A log analysis tool where the AI assists me.”
The primary motivation for developing this tool is to use it myself in daily work. Specifically, I use it to analyze logs when investigating issues in the software I develop and support. TWLogAIAN is built to be the ideal tool for this exact purpose.
How It Differs from Typical Log Analysis Systems
- Logs are kept only during analysis.
- Once the analysis is complete, everything can be deleted without a trace.
- Runs smoothly on a standard personal computer.
- Allows you to create and delete your own full-text search indexes.
The workflow is simple: when you get logs to troubleshoot a problem, you import them, perform the investigation, and once the issue is resolved, you can delete the folder to wipe all traces. While large-scale log analysis systems require high-performance servers, TWLogAIAN is designed to make lightweight analysis easy and accessible directly on your local computer.
Key Features
- Quickly collect logs from various sources.
- Filter collected logs at high speed.
- Easily and quickly extract data fields from logs.
- Build full-text search indexes from logs and extracted data.
- Search and analyze aggregated and extracted data easily with AI assistance.
- Visualize aggregated data, extracted data, and AI analysis results.
- Export analysis results (lists and graphs) easily to CSV and Excel files.
Supported Log Sources
- Local files
- Remote files (via SCP)
- Logs saved in TWSNMP FC
- Docker/Kubernetes logs (via command execution/SSH)
- Gravwell logs
- Windows Event Logs (including remote servers)
Architecture of TWLogAIAN
The backend is developed in Go, and it uses Bluge as its full-text search engine:
https://blugelabs.com/bluge/

Installation: Windows
Available on the Microsoft Store:
Installation: macOS
Available on the Mac App Store:
https://apps.apple.com/app/twlogaian/id1664596440
Installation: Linux
The Linux version can be downloaded from the GitHub Releases page:
https://github.com/twsnmp/TWLogAIAN/releases
- Download the Linux (amd64) archive
TWLogAIAN-linux-amd64.tar.gz. - Extract the archive in a terminal:
tar -zxvf TWLogAIAN-linux-amd64.tar.gz - Run the extracted
TWLogAIANbinary:./TWLogAIAN
Notes & Troubleshooting
TWLogAIAN uses the Wails framework, which requires GTK3 and WebKit2GTK (4.1) at runtime. If the application fails to start due to missing libraries, install them via your distribution’s package manager:
- Ubuntu / Debian-based:
sudo apt update sudo apt install libgtk-3-0 libwebkit2gtk-4.1-0 - Arch Linux:
sudo pacman -S gtk3 webkit2gtk-4.1
Alternative Downloads
You can find the latest installer releases at:
https://github.com/twsnmp/TWLogAIAN/releases
Download the Windows MSI installer (TWLogAIAN.msi), the macOS PKG installer (TWLogAIAN_dev.pkg), or the Linux archive (TWLogAIAN-linux-amd64.tar.gz).
Launching: Windows
On Windows, start the application from the Start menu.
Launching: macOS
On macOS, launch the application from the Launchpad or via your preferred method.
Launching: Linux
Run the TWLogAIAN executable in the directory where it was extracted, or register it in your desktop environment’s launcher to start it.
Welcome Screen
When launched, the Welcome screen is displayed.
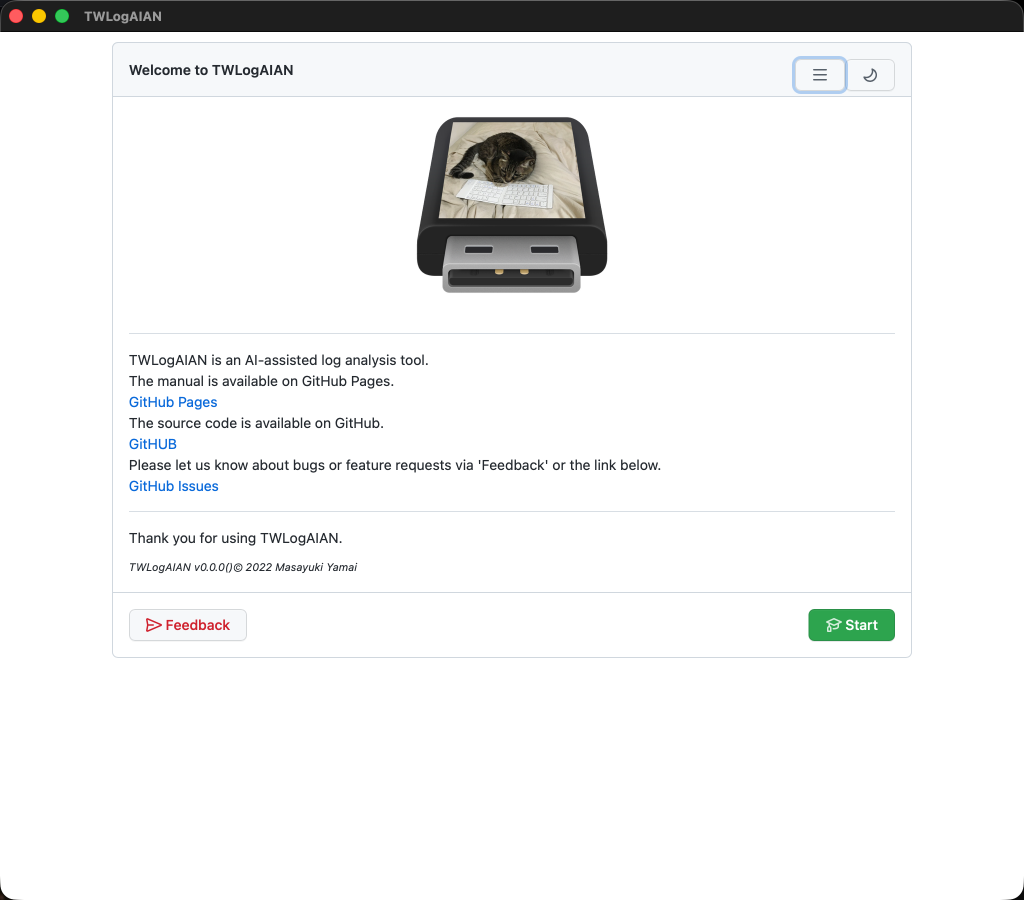
Screen Mode Switch
The application starts in light mode by default. Click the moon icon in the top right to switch to dark mode. Click the sun icon in the top right to return to light mode. Note that mode switching is only available on this screen. Using dark mode will make you look like a pro.
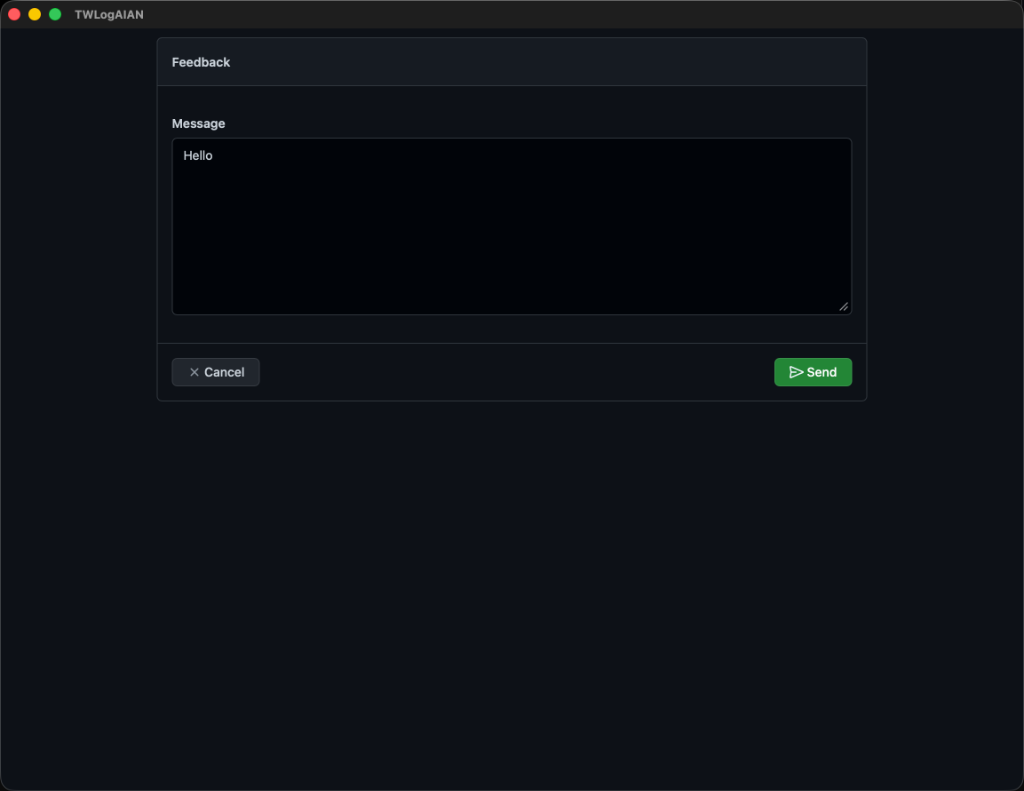
Feedback
Clicking the Feedback button opens the feedback dialog. Please enter any issues or feature requests and click Send. Your feedback goes directly to the developer, and I will do my best to address it. *Please note: No information other than the source IP address is transmitted.
Log Analysis Flow
- Select a workspace folder
- Configure log sources (where logs are loaded from)
- Configure indexing options
- Load logs
- Search logs
- View analysis reports

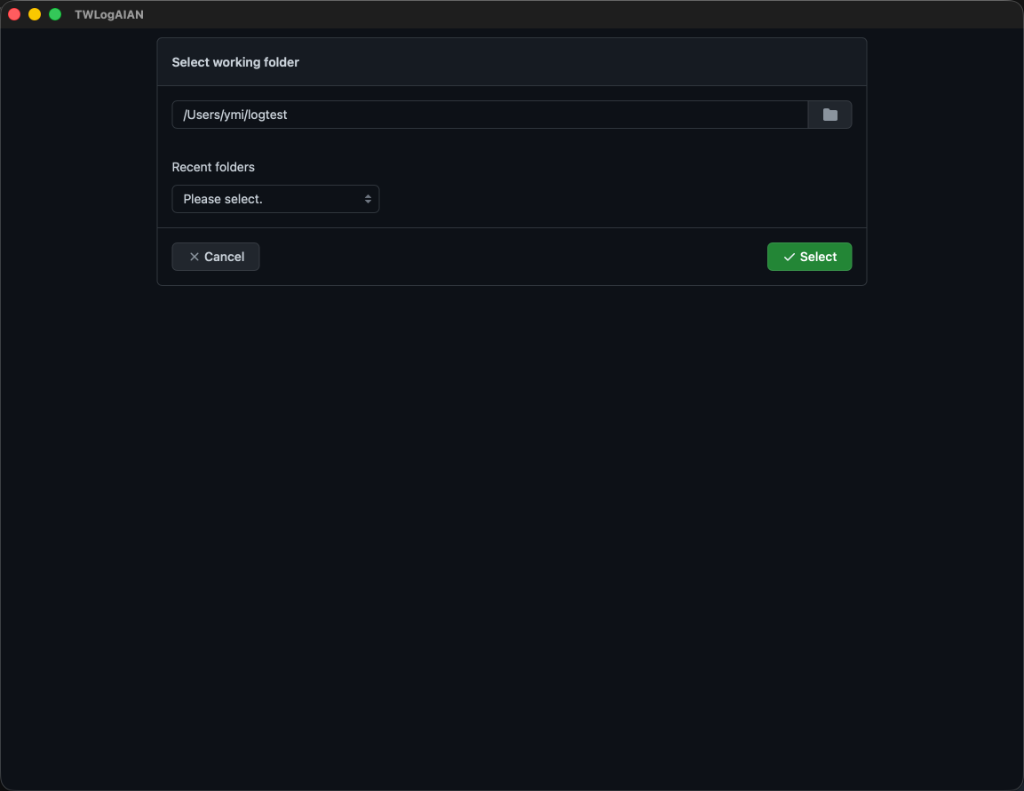
Selecting a Workspace Folder
Click the Start button on the Welcome screen to open the workspace folder selection dialog. The selected folder will hold the configuration files and full-text search indexes created during analysis. Once the analysis is complete, deleting the entire folder cleans up all files. Select your folder and click Select to open the log analysis configuration screen.
Log Analysis Settings Screen
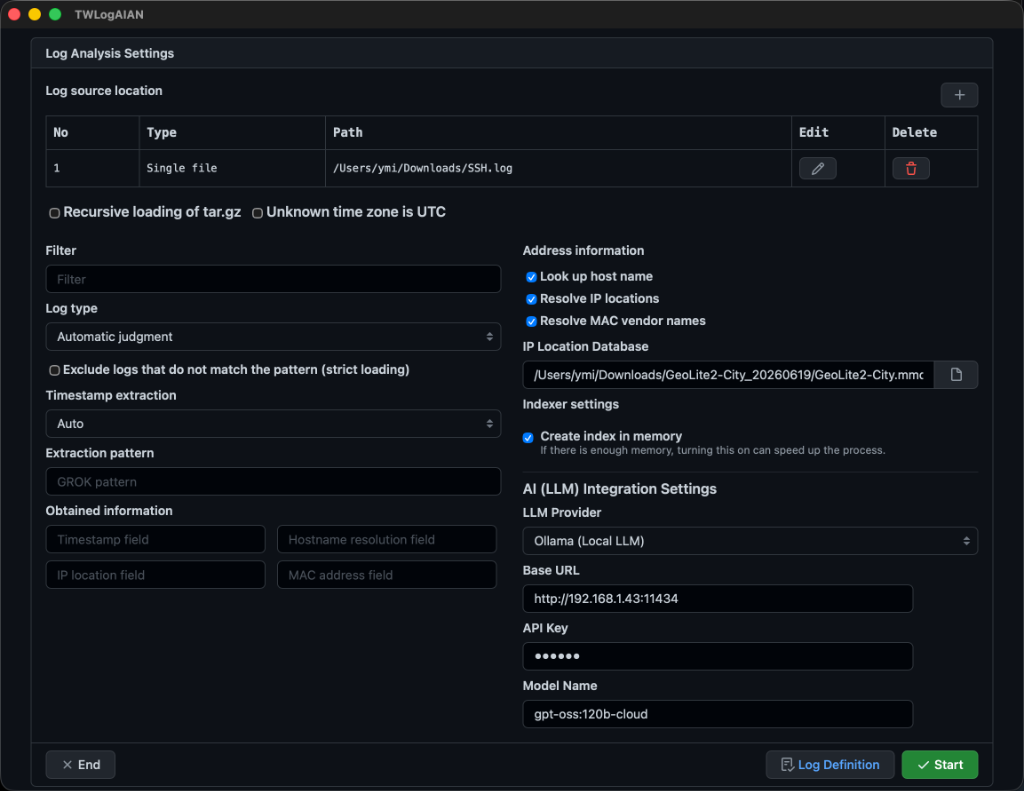
Selecting the workspace folder displays the log analysis configuration screen. The image below shows the screen when “Custom” is selected for the log type, displaying all available options.
Recursive tar.gz Extraction
Check this option to recursively extract and read archives nested inside other tar.gz files. There is no depth limit, so use this with care as it may result in loading an extremely large volume of logs.
Treat Unknown Time Zone as UTC
Many log timestamps do not specify a time zone. By default, TWLogAIAN treats unknown time zones as the local time zone. If you prefer to interpret them as UTC, enable this option.
Filters
Filters allow you to restrict which log lines are imported. You can specify a regular expression to match. Filtering helps you build a search index containing only the logs relevant to your analysis, which significantly reduces index size and speeds up import and search times.
For example, on an access log, setting the filter to:
POST
will only load logs that contain the string POST (i.e., HTTP POST requests).
Log Types
Specify the format of the log you are loading. TWLogAIAN has built-in parsers for various common log formats (as shown on the right). For instance, it supports both the legacy BSD syslog format and the modern IETF syslog format (which includes time zones and sub-second timestamps). Select “Custom” if you want to define parsing rules yourself, or choose “Auto Detect” to let the application automatically identify the log format.
Hostname Resolution
Enabling this option checks the IP addresses in the log via DNS and appends the resolved hostnames. When using a custom log type, enter the variable names of the IP address fields in the Hostname Resolution Items field. For built-in log types (such as Apache access logs), these fields are configured automatically.
GeoIP Lookup
Enabling this option looks up IP addresses in a GeoIP database to resolve location information and append it to the log records. For custom log types, enter the variable names of the IP fields in the IP Location Items field. For built-in log types, these fields are configured automatically.
For instructions on obtaining a compatible GeoIP database, please refer to the following article:
https://qiita.com/twsnmp/items/bfeab550b7f9b775f754
(Note: Download procedures may have changed). Once downloaded, specify the path to the database file in the IP Location Database field at the bottom of the settings screen.
MAC Address Vendor Lookup
Enabling this option checks MAC addresses in the logs against a built-in OUI database to resolve and append the hardware vendor names. Specify the MAC address variable name in the MAC Address Items field.
Timestamp Field
Specifies the variable name of the field to be used as the log timestamp. If left blank, TWLogAIAN will automatically detect and use the leftmost timestamp-like string.
Hostname Resolution Items
Specifies the variable names of the IP fields to resolve to hostnames. You can specify multiple fields separated by commas.
IP Location Items
Specifies the variable names of the IP fields to check for location data. You can specify multiple fields separated by commas.
MAC Address Items
Specifies the variable names of the MAC address fields to check for vendor names. You can specify multiple fields separated by commas.
Storage Engine Selection (v2.1.0)
Starting with TWLogAIAN v2.1.0, you can select the underlying storage engine for loaded logs:
- Bluge (Default / Full-Text Search Engine): Builds a full-text search index for fast keyword, compound, and field queries. Supports the full-text search query syntax.
- Parquet (Columnar Storage): Saves logs in high-performance columnar format. Greatly reduces storage size and boosts ingestion performance for large log volumes.
- Badger (High-Performance KVS): A fast key-value store in pure Go providing steady, high-throughput storage.
- Bbolt (Embedded DB): A lightweight and reliable embedded transactional database.
[!NOTE] Search Differences by Storage Engine: When using a non-Bluge storage engine (Parquet, Badger, Bbolt), full-text indexes are not created, so Full-Text Search Mode is unavailable. On the other hand, queries match directly against raw log lines using Go’s standard regular expression engine, so Regular Expression Mode operates with full accuracy and precision. See How to Write Search Queries for details.
Create Index in Memory
Keeps loaded logs and indexes in memory (for Bluge). All data is discarded upon exit. If unchecked, data is persisted to the workspace folder on disk.
IP Location Database
Specifies the path to the GeoIP database file.
Log Loading Locations
This section explains where TWLogAIAN can load logs from (highlighted in red in the screenshot). Logs stored within compressed archives can be read directly. Windows event logs are also supported.

Adding a Log Source
To specify a new log source, click the + button in the “Log Loading Location” list on the settings screen. This opens the log source creation/editing dialog.
Editing a Log Source
To edit an existing log source, click the edit button (pencil icon) next to it in the list.
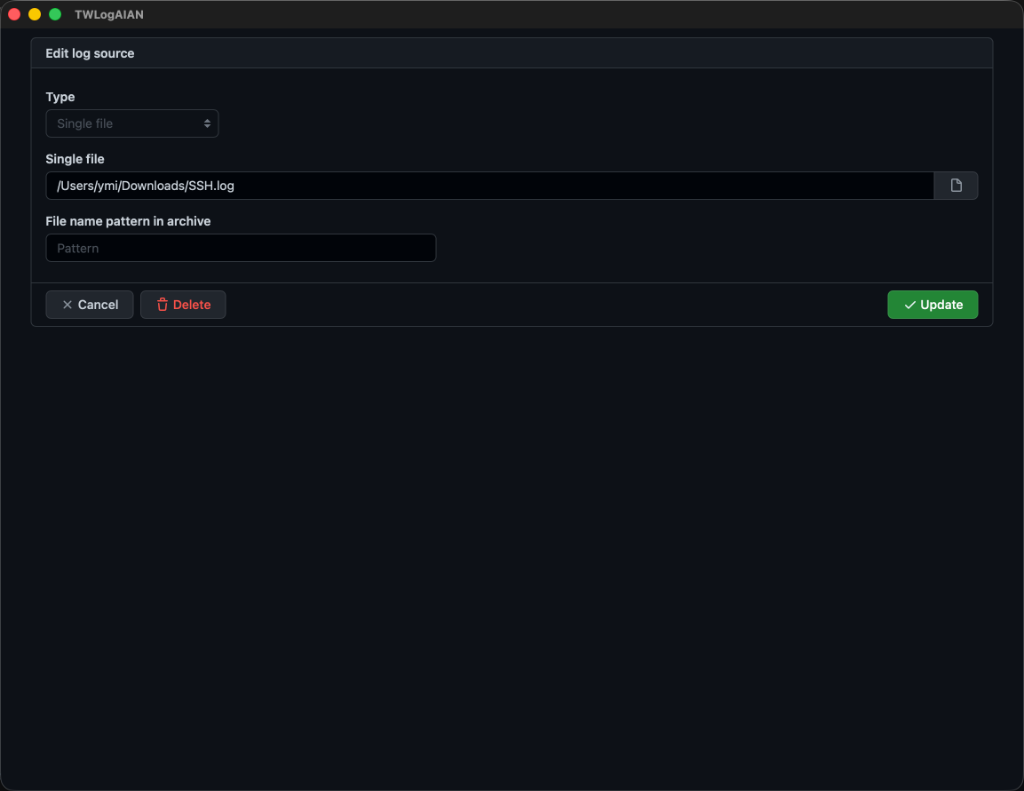
Log Source Editing Dialog
The editing dialog for log sources is shown on the right.
Deleting a Log Source
You can delete a log source from its editing dialog by clicking the Delete button. Alternatively, click the delete button (trash can icon) directly in the sources list.
Log Source Types
The available log source types are shown on the right. The Windows version includes a specific type to fetch Windows Event Logs.
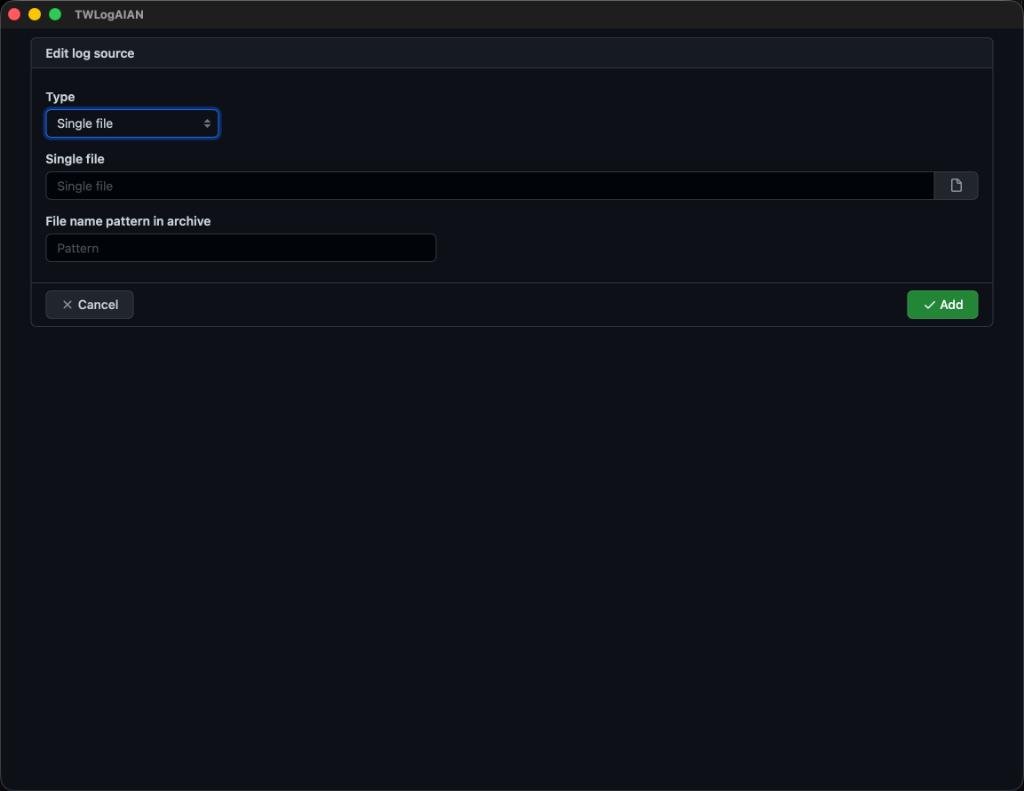
Single File
Imports logs from a single file. You can select the file using the button to the right of the path field. (Note: On macOS, the file chooser dialog may appear in English).
File Name Pattern in Archive
You can select compressed files (such as ZIP or tar.gz). For archives, you can specify file filters to choose which files inside the archive to read. Specifying a pattern like:
access*
will only load files inside the archive whose names start with “access”.
Folder
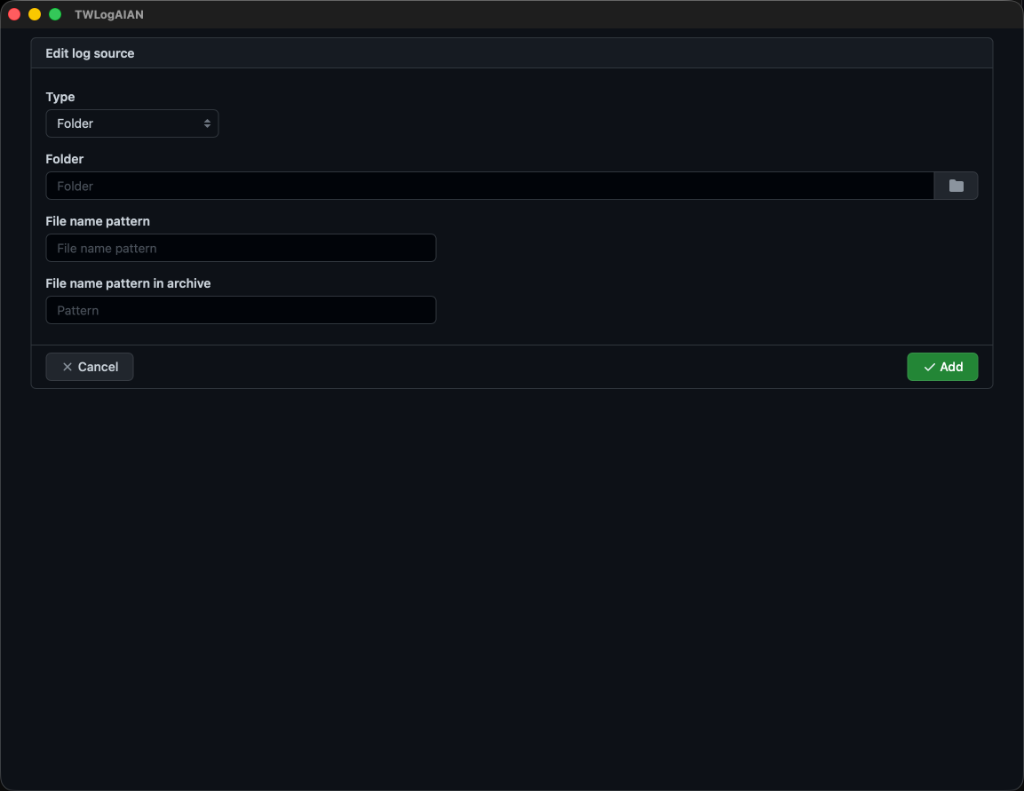
Imports all log files located within a specified folder. Note that only the top-level files in the folder are read; subdirectories are not supported.
File Name Pattern
To import only specific files within the folder, specify a file name pattern.
access*
This will limit the search to files starting with “access”. This pattern also applies to ZIP and tar.gz archives inside the folder. For archives, you can also filter files inside them, identical to the Single File settings.
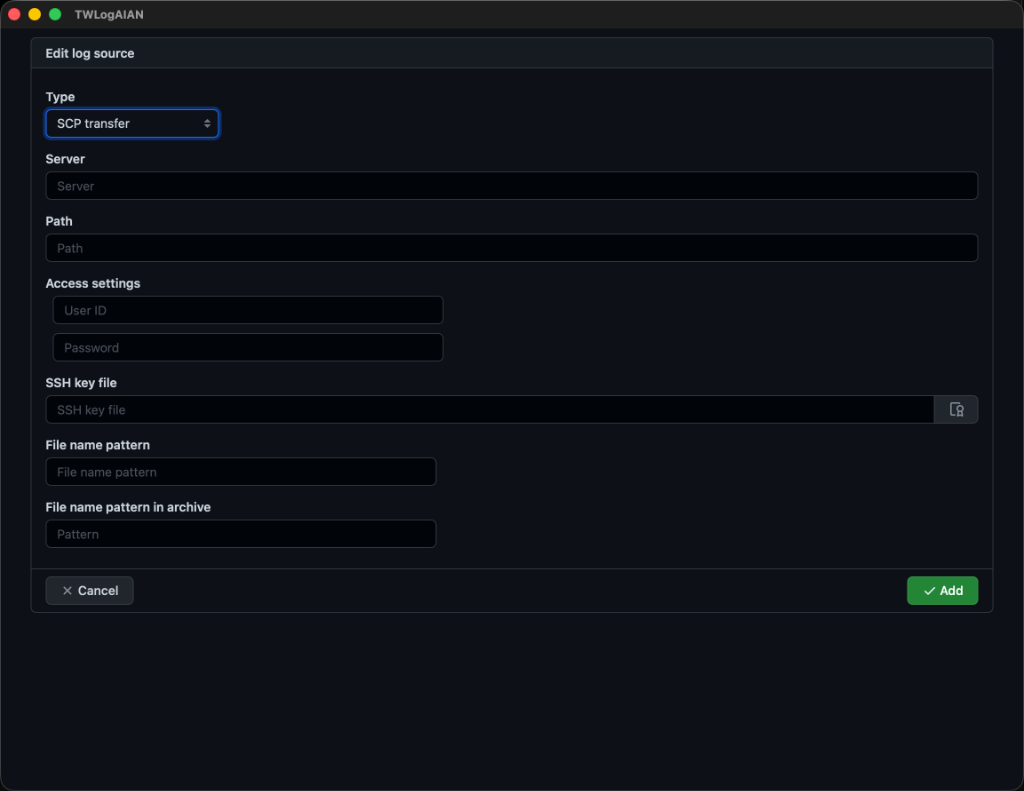
SCP Transfer
You can fetch log files directly from Linux or other remote servers using SCP. This is much more convenient than manually transferring and saving files to your local PC. Specify the server’s IP address/hostname, log path, user ID, private key password (if applicable), and the SSH private key path (defaults to the standard SSH location if left blank). Once configured, it behaves similarly to a local folder source; you can use file name patterns and archive filters to select target logs.
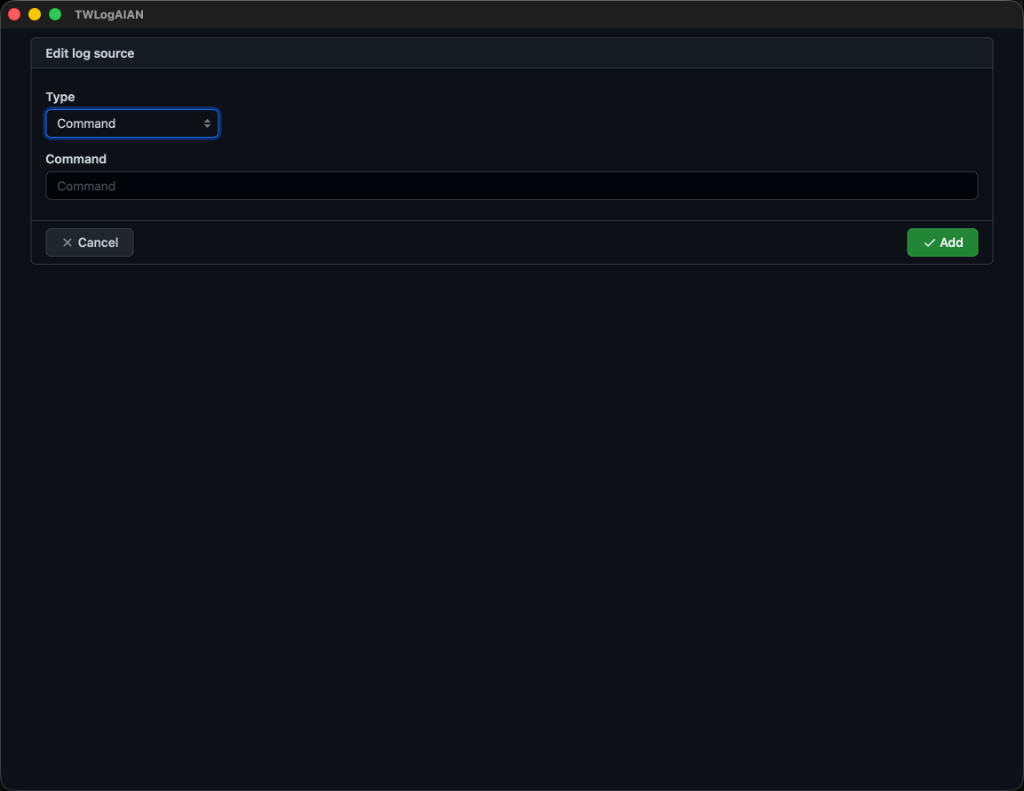
Command Execution
Executes a command locally and imports its standard output as log entries. This is useful for fetching and analyzing Docker or Kubernetes logs on the fly. Specify the command to run.
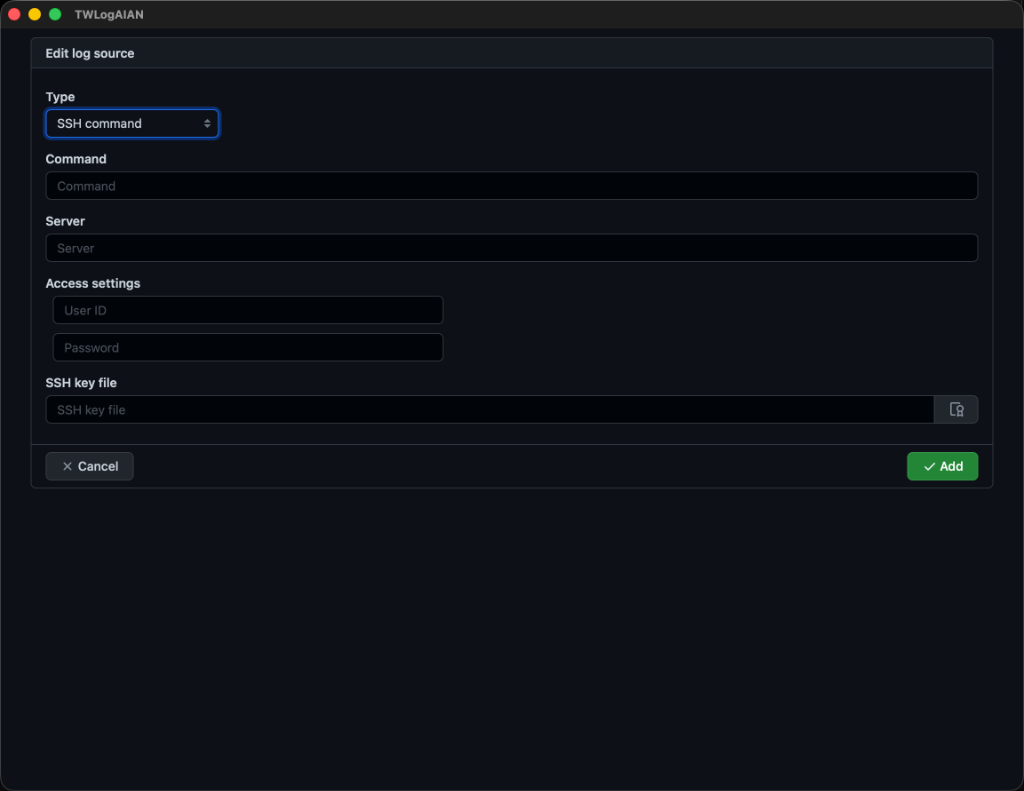
SSH Command Execution
Similar to Command Execution, but the command is executed on a remote server connected via SSH. This is particularly convenient for analyzing logs in cloud environments. Along with the command, you need to configure SSH connection settings: server address, username, password, and the location of the SSH key file.
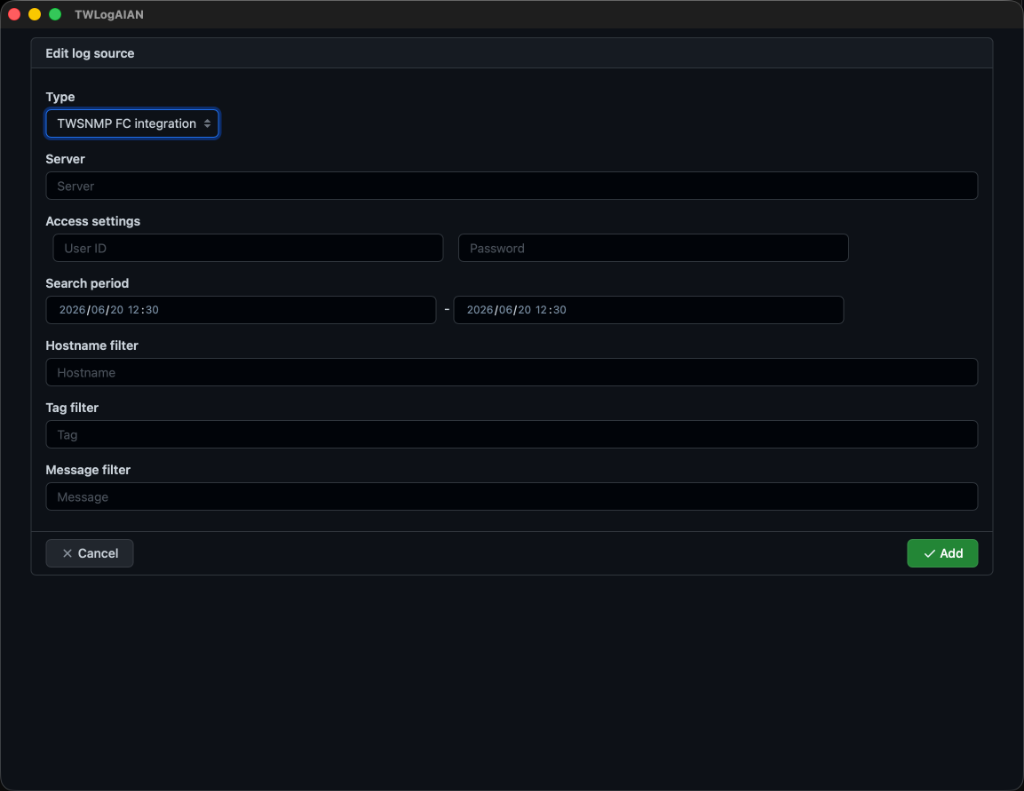
TWSNMP FC Integration
Allows you to import syslogs directly from TWSNMP FC. Specify the TWSNMP FC server URL, along with the login credentials (user ID and password). You can also set filter criteria such as time range, hostname, tag, and message keywords to narrow down the retrieved logs.
Windows Event Logs
In a Windows environment, you can import Windows Event Logs directly. This feature utilizes wevtutil.exe to fetch logs:
https://docs.microsoft.com/en-us/windows-server/administration/windows-commands/wevtutil
(Note: A command prompt window will briefly appear during retrieval; this is intentional). You can retrieve logs from both the local Windows machine and remote servers. For remote servers, configure the target host, user ID, password, and authentication method in the access settings. For local logs, credentials are not required. Specify the time range and event channel (e.g., Application, Security). Note that to retrieve Security channel logs, TWLogAIAN must be run with administrator privileges.
SFTP / FTP Transfer (v2.1.0)
In addition to SCP, transferring and importing log files directly from SFTP and FTP servers is supported. Specify the server hostname, port, username, password, and remote directory/file path.
HTTP / Web API Ingestion (v2.1.0)
Send HTTP/HTTPS requests (GET or POST) directly to Web/REST APIs to fetch response logs (JSON or plain text) and ingest them into the store. Supports custom headers, query parameters, and authentication tokens.
Grafana Loki Integration (v2.1.0)
Query Grafana Loki servers using LogQL to fetch logs. Configure the Loki endpoint URL, label selector query, time range, and optional authentication credentials.
Elasticsearch Integration (v2.1.0)
Import log records matching search queries directly from Elasticsearch cluster indices. Configure the cluster URL, index pattern, query string, timestamp field, and credentials.
Supported File Formats
TWLogAIAN supports text-based log files that contain timestamps. The timestamp format is detected automatically. Compressed archives in .gz, .bz2, .xz, and .zst formats are automatically extracted upon import. Log files inside ZIP archives are fully supported. For .tar.gz archives, nested folders and multi-layered compression (such as archives inside archives) are supported when Recursive tar.gz Extraction is checked. Windows Event Log format (.evtx) is also supported up to 1 GB per file.
Indexing
TWLogAIAN reads log files and builds a full-text search index. This section explains the indexing process (highlighted in red in the screenshot).
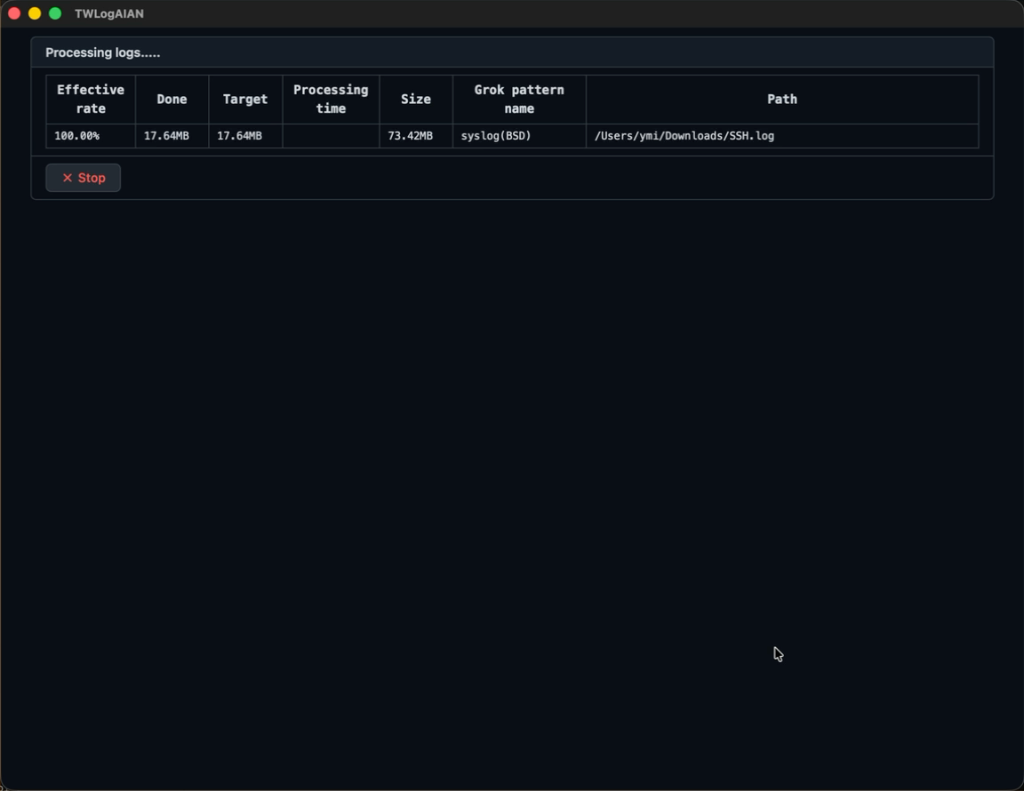
What is Indexing?
When logs are imported, TWLogAIAN parses each line to extract meaningful fields and registers them in the search index. For example, consider this Apache access log entry:
114.119.136.254 - - [03/Apr/2022:00:39:21 +0900] "GET /wiki/index.php?
title=Must_Know_Mlm_Concepts_For_Accomplishment&action=history HTTP/1.1" 404 1417
 "-" "Mozilla/5.0 (Linux; Android 7.0;) AppleWebKit/537.36 (KHTML, like Gecko)
  Mobile Safari/537.36 (compatible;
  PetalBot;+https://webmaster.petalsearch.com/site/petalbot)"
This line contains structured data: client IP, timestamp, request method, path, status code, and response size. While you can index the entire line as plain text, extracting each value into index fields makes searches much faster and allows for easy aggregation and analysis.
Field Extraction by Log Type
If we process the previous log entry using the Apache (Combined) type, the fields shown on the right will be extracted. In this example, the extracted fields include data directly parsed from the log content, as well as additional information like resolved hostnames (via DNS lookup) and geographical location details (via GeoIP). Because TWLogAIAN is a dedicated log analyzer, it requires at least a timestamp to be extracted. Common log formats are built-in, but you can also configure custom field extractions.
Searching Logs
Once log loading and indexing are complete, you can search your logs. This corresponds to the area highlighted in red on the right.
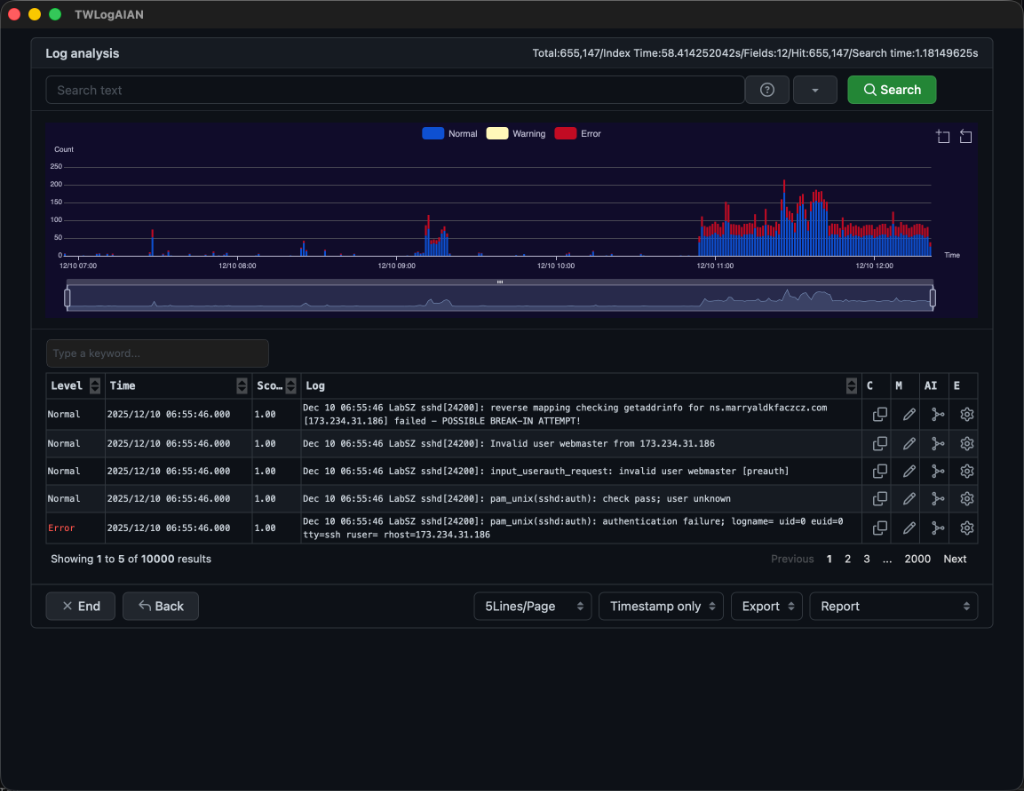
Basics of Log Search
Immediately after indexing completes, the search screen will appear as shown. The number of logs indexed and the elapsed time are displayed in the top right. To search, enter keywords into the search box at the top. Leaving the search box blank and clicking search retrieves all logs. You can change the query mode to use Bleve query syntax:
https://blevesearch.com/docs/Query-String-Query/
Specifying Search Criteria
Clicking the down arrow button next to the search box opens the search criteria panel, allowing you to set detailed search filters.
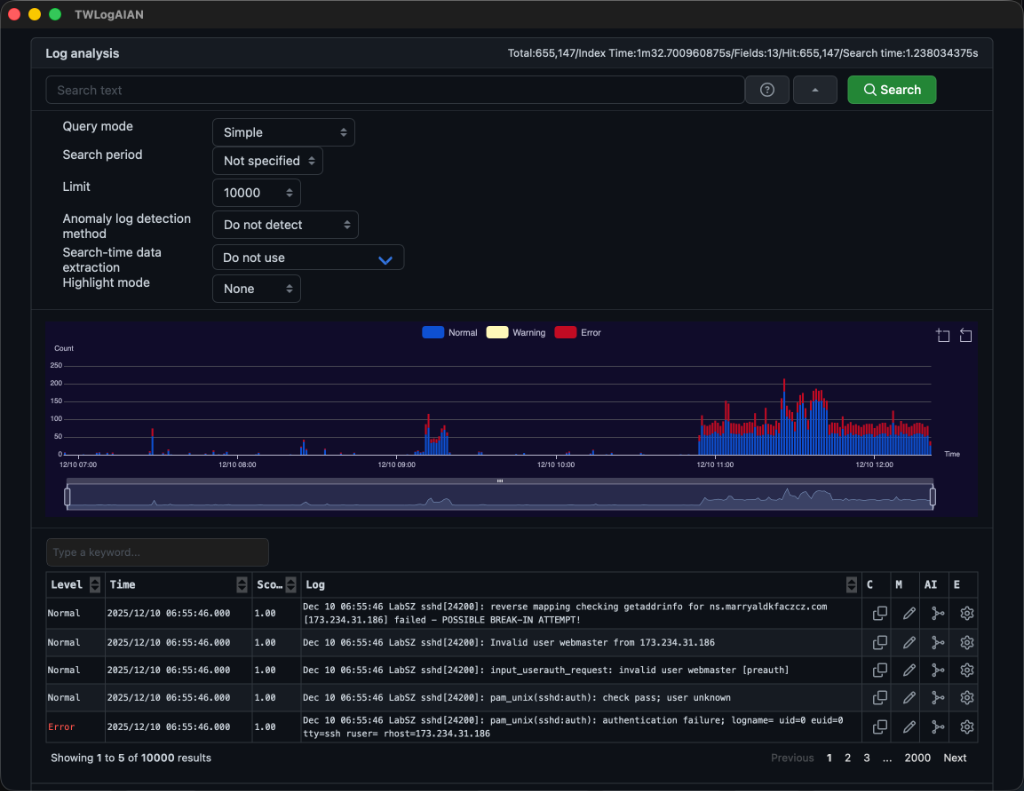
Search Criteria Panel
- Search History: View past queries.
- Query Mode: Choose how the search string is interpreted.
- Time Range: Filter by timestamps.
- Max Results: Limit the number of matching records.
- Anomaly Detection: Run machine learning models to detect outliers.
- Extract Data on Search: Extract fields dynamically during search.
You can close this panel by clicking the up arrow button in the same location.
Search History
A list of previously executed search queries. Click an item to populate the search box. You can clear the history using the delete button on the far right.
Query Mode
Determines how your search input is parsed. Options include:
- Simple: Searches for keywords using space-separated AND logic,
!(NOT), and*(prefix wildcard). Available across all storage engines. - RegEx: Searches using regular expression syntax. Operates with full accuracy when using non-Bluge engines (Parquet, Badger, Bbolt).
- AI (v2.1.0): Describe what you want to find in natural language; the LLM automatically formulates an optimal regular expression and searches.
- Full Text (Bluge only): Full-text search query syntax with keyword and numeric criteria helpers. Available exclusively when using Bluge.
Search Period
Specifies the time range for your search. There are two modes:
-
Target Mode: Paste a specific timestamp to focus on a particular point in time.
-
Range Mode: Specify a start and end time range.
Anomaly Detection (Enhanced in v2.1.0)
Use machine learning and deep learning models to identify anomalous log entries. Available algorithms include:
- Isolation Forest: Fast decision-tree-based outlier detection
- Z-Score (v2.1.0): Statistical standard deviation score detection
- Local Outlier Factor (LOF): Local density-based outlier detection
- KNN (K-Nearest Neighbors) (v2.1.0): Distance-to-neighbors anomaly score
- Mahalanobis Distance (v2.1.0): Multivariate distance taking covariance into account
- Auto Encoder (tensai) (v2.1.0): Neural network reconstruction error detection
- LSTM (tensai) (v2.1.0): Long Short-Term Memory deep learning model for time series anomaly detection
- Sum: Simple sum of feature magnitudes
If detection is enabled, you can select which feature vector calculation mode to use:
- Numeric data
- Numeric data + Day of week & Hour
- String & Numeric data
- String & Numeric data + Day of week & Hour
- SQL injection pattern count
- OS command injection pattern count
- Directory traversal pattern count
- Web access (Walu) pattern count
- TF-IDF (Term Frequency - Inverse Document Frequency vector)
Viewing Search Results
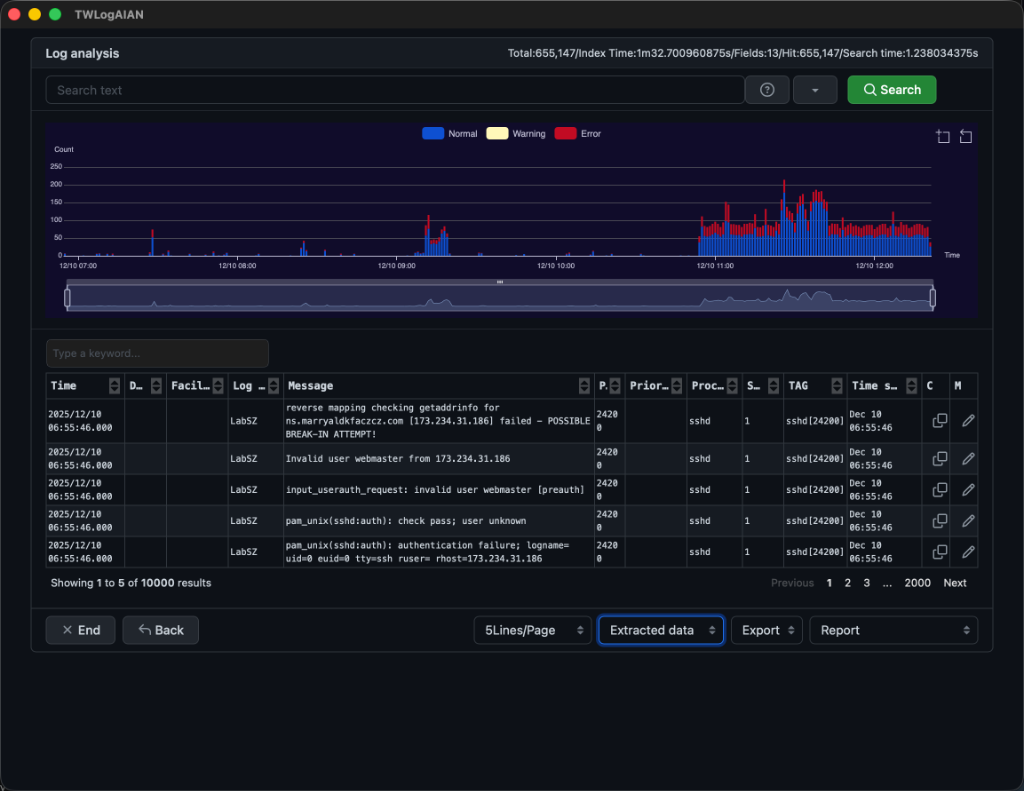
After running a query, the results screen is displayed as shown below.
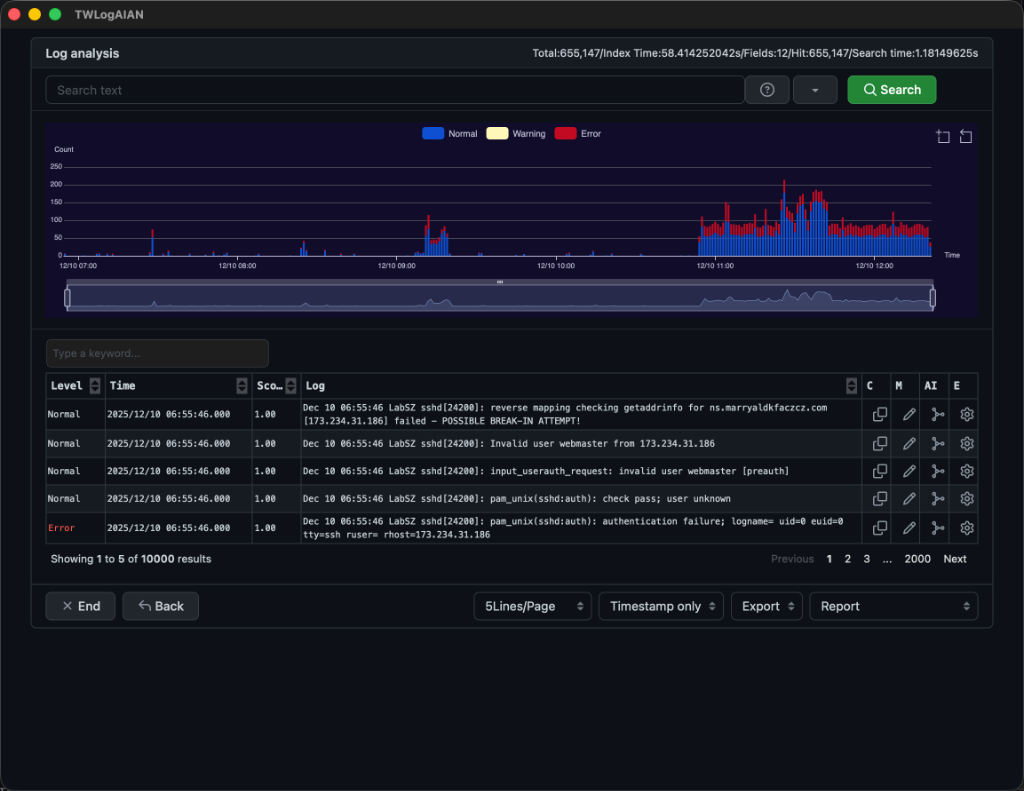
Linked Graph and Log List
Adjusting the time window on the chart will automatically update the log list to match that timeframe. Click the zoom button in the top right of the chart to select a custom range by dragging across the graph.
Filtering by Keyword
You can enter a text string in the keyword filter box to dynamically filter the displayed log list.
Log Display Formats
Beneath the search results, you can select the display format to change how log entries are presented in the list.
Time Only
Displays only the timestamp, search score, and raw log message. You can select log entries via the checkbox on the left to copy them to the clipboard or save them to your notes.
Syslog
A layout optimized for syslog files. This option is disabled if the logs were not parsed using syslog format.
Access Log
A layout optimized for web server access logs. This option is disabled if the logs were not parsed using access log format.
Extracted Data
Displays parsed fields in a structured table. You can scroll horizontally to view additional fields.
Anomaly Score
Similar to the Time Only format, but the search score is replaced with the calculated anomaly score. This layout is only available when Anomaly Detection is enabled.
Export
An export menu is available at the bottom of the search results screen.
- CSV: Saves the log list to a CSV file.
- Excel: Saves the log list and chart images to an Excel spreadsheet.
- AI: Exports the logs to the AI along with descriptive prompts.
Reports
TWLogAIAN features robust reporting tools to visualize log analysis in charts and lists. Searching logs displays the reports menu at the bottom of the screen. Click on an item to open the corresponding report view.
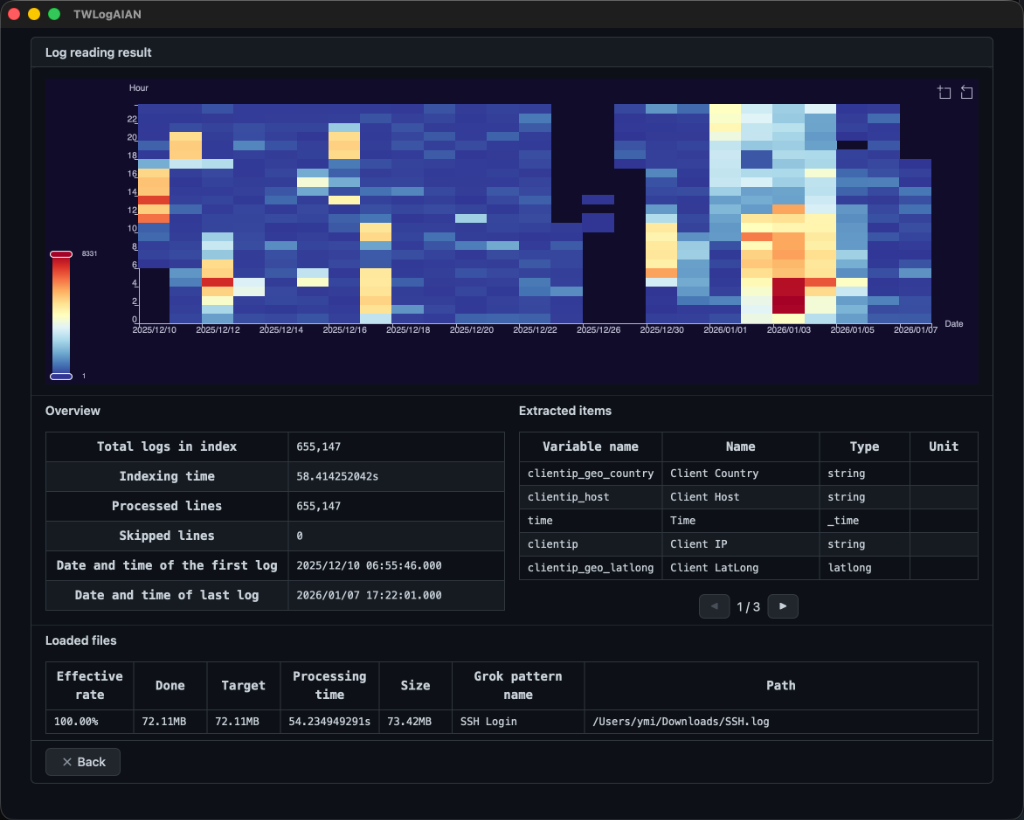
Processing Results
Displays a retrospective view of index creation and AI training states. You can review log volume metrics, parsed field definitions, and peak log activity hours.
Notes (Memo)
The Notes report aggregates log entries you’ve flagged during search. You can add entries to your notes using the Memo button on the right side of the log search list.
Viewing Notes
Selecting Memo from the Report menu displays the notes screen, showing flagged log entries in chronological order.
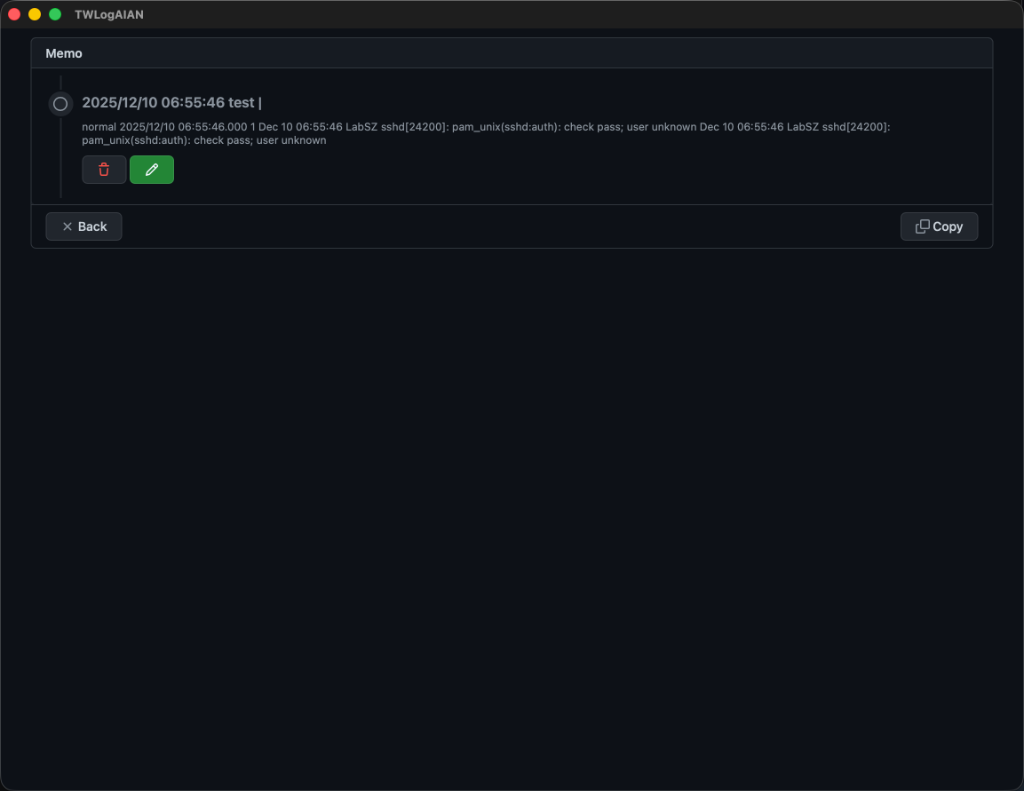
Each note features Delete and Edit buttons.
In the editing dialog, you can select severity levels and add descriptions. This is helpful for documenting what each log entry represents during investigations.
When finished, click the Copy button at the bottom of the screen to copy the compiled notes to your clipboard. This makes it easy to paste findings directly into emails or reports.
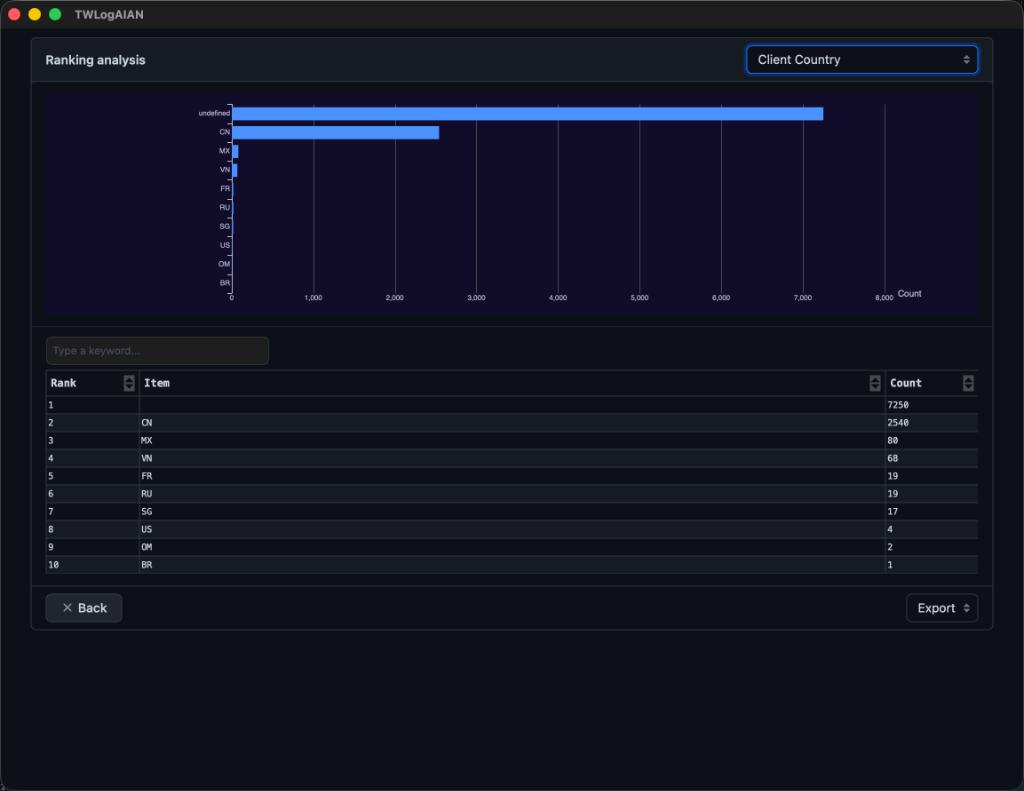
Ranking Analysis
Displays compiled ranking charts based on fields extracted from the logs. You can select the target field to rank from the dropdown menu in the top right.
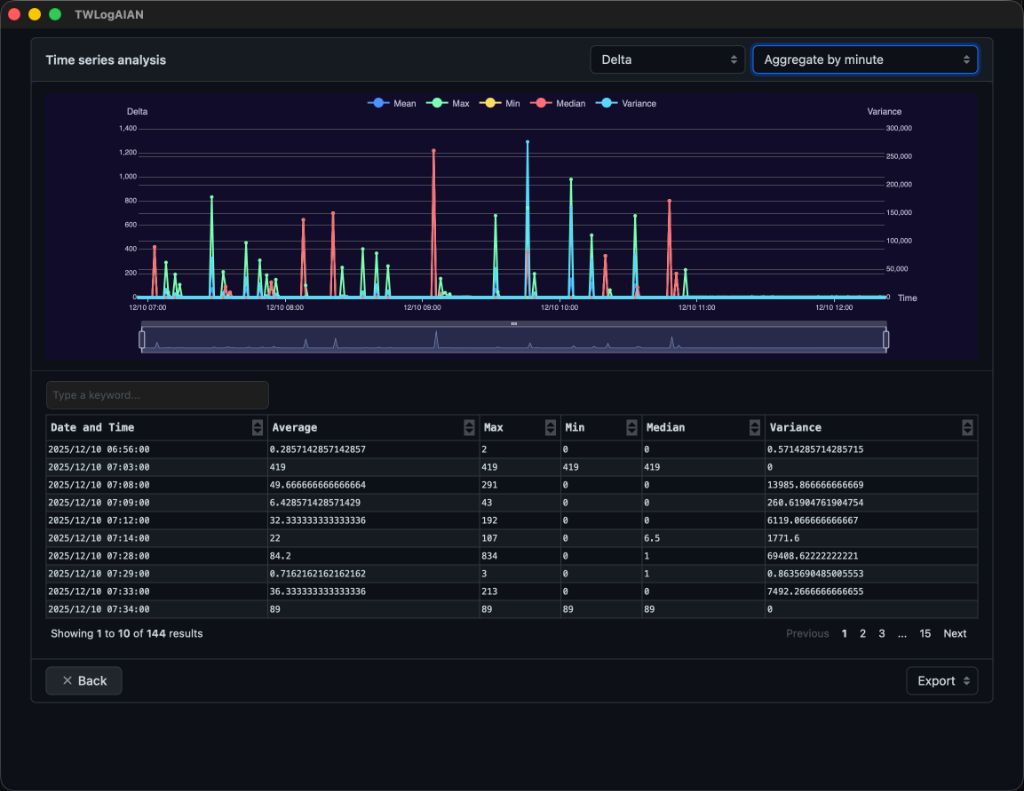
Time Series Analysis
Plots extracted numeric data on a time-series line chart. Use the top-right menus to select the field and aggregation level:
- Raw Data: Plots the extracted numeric values directly.
- Minutely Aggregation: Aggregates data by the minute, displaying the mean, median, variance, max, and min values.
- Hourly Aggregation: Aggregates data by the hour, displaying the mean, median, variance, max, and min values.
Regression Analysis
Performs regression analysis on selected numeric data using the chosen method. For example, the “Linear” method calculates the slope (a) and intercept (b) of the equation (y = ax + b) and overlays the trend line on the graph. (This is useful for metrics like disk space or memory utilization to project usage exhaustion rates).
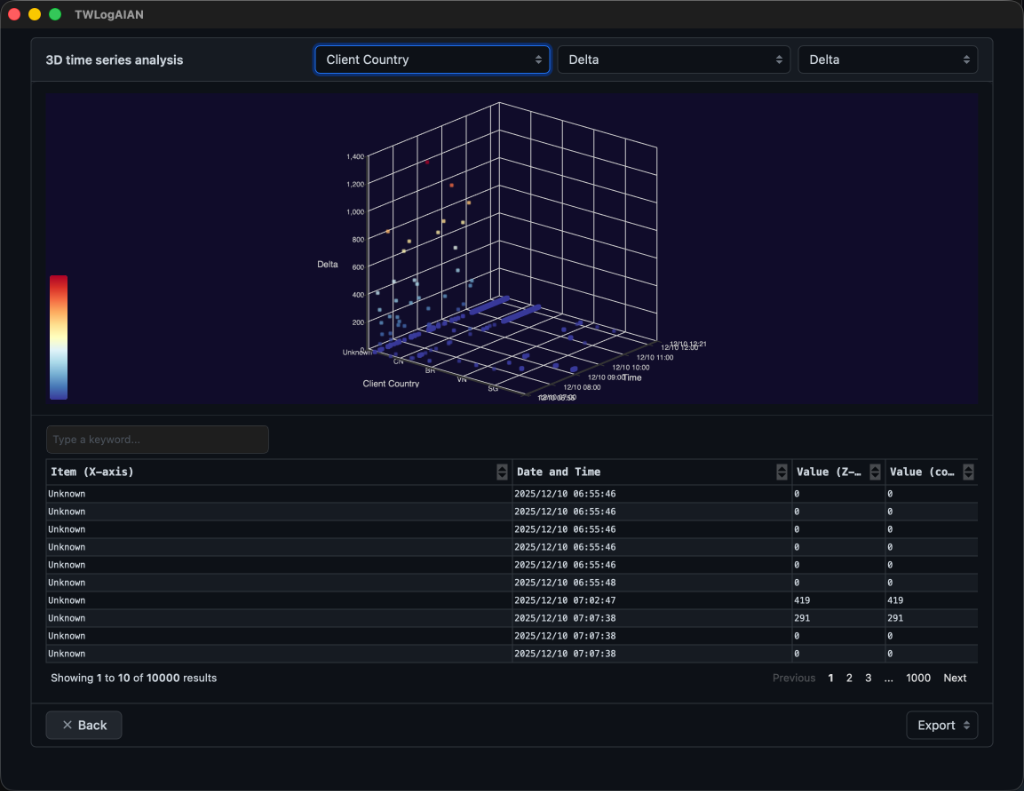
3D Time Series Analysis
Plots numeric data on a 3D time-series graph. The Y-axis is fixed to time, while you can assign X-axis, Z-axis, and color-coding fields via the menus in the top right. You can rotate the graph and change your perspective by clicking and dragging. “There are things that cannot be seen in a 2D graph,” proclaims the Assistant Cat from above.
Cluster Analysis
Performs cluster analysis using numeric fields extracted from the logs. Select two numeric fields and specify the target number of clusters in the top-right menu. Cluster analysis might reveal hidden patterns in your log metrics.
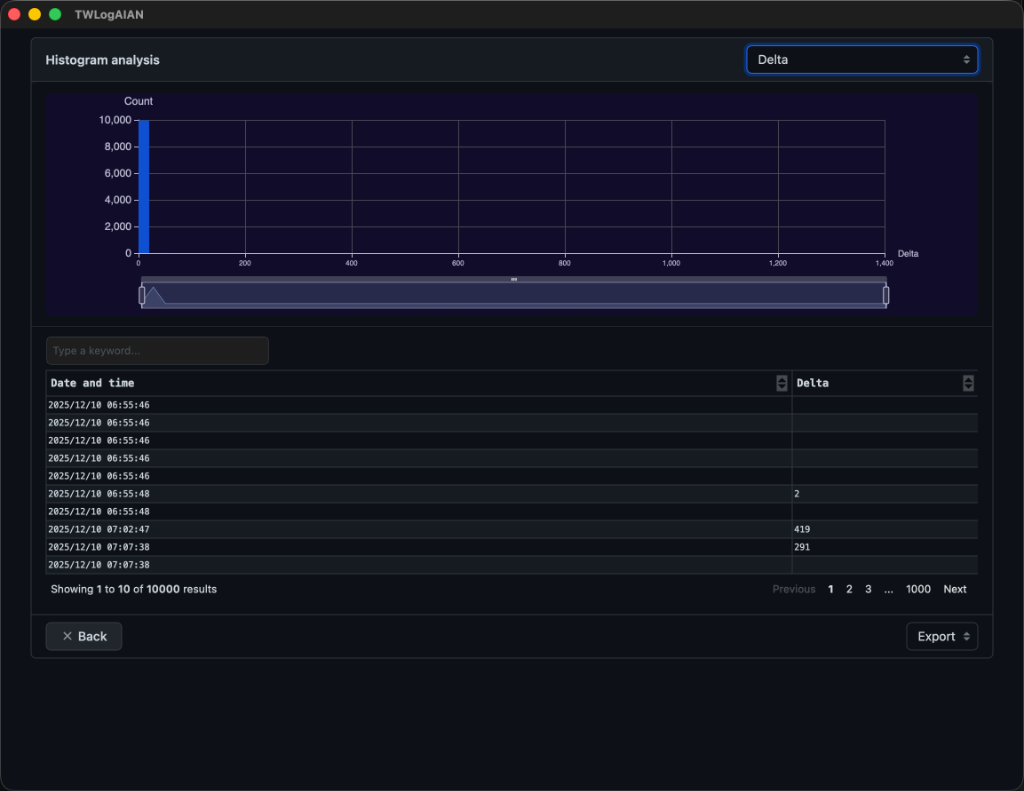
Histogram Analysis
Displays a histogram distribution of selected numeric fields. Select the target field from the menu in the top right.
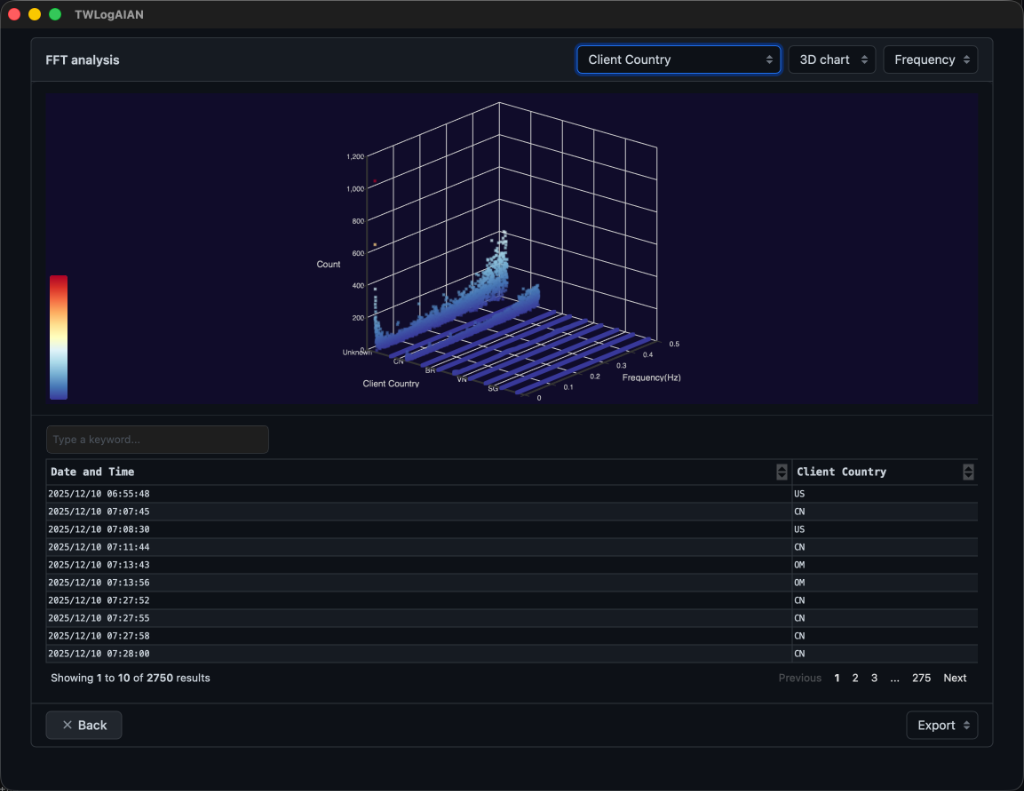
FFT Analysis (3D)
Performs Fast Fourier Transform (FFT) analysis on numeric fields. FFT can help expose periodic patterns and cycles in log occurrences.
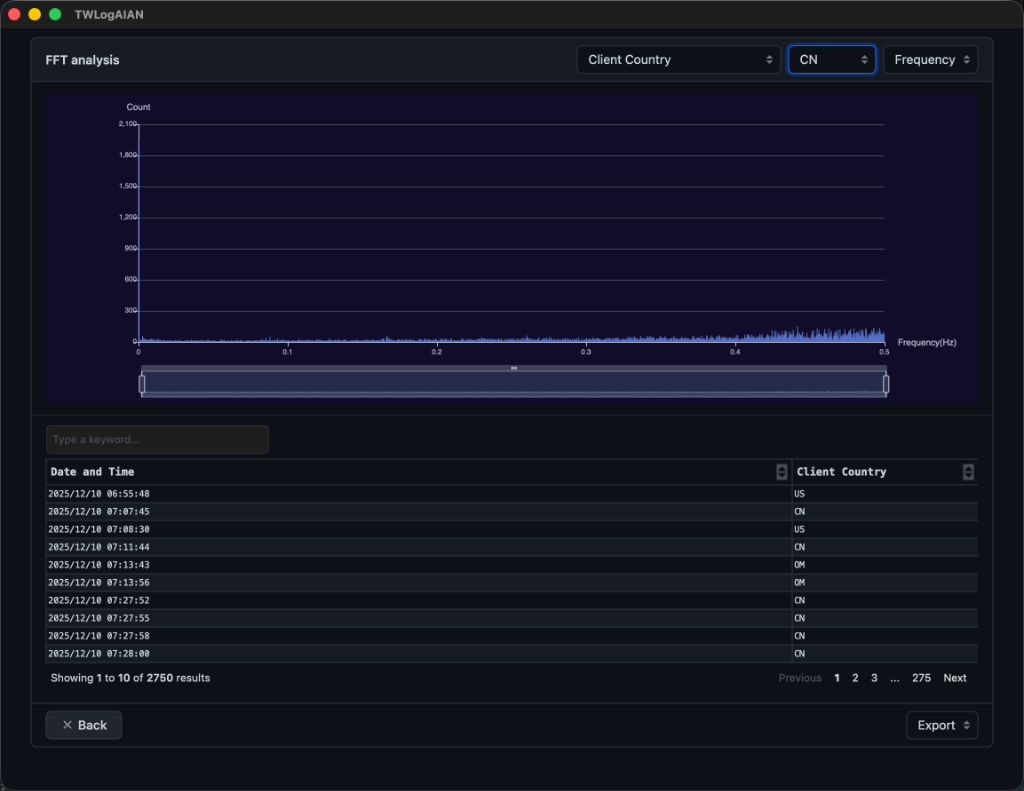
FFT Analysis (2D)
Provides detailed 2D frequency domain charts. Use the top-right menus to select the target field, chart type, and toggle between frequency and period. (The 2D graph shown on the right highlights access interval periods from a specific IP address).
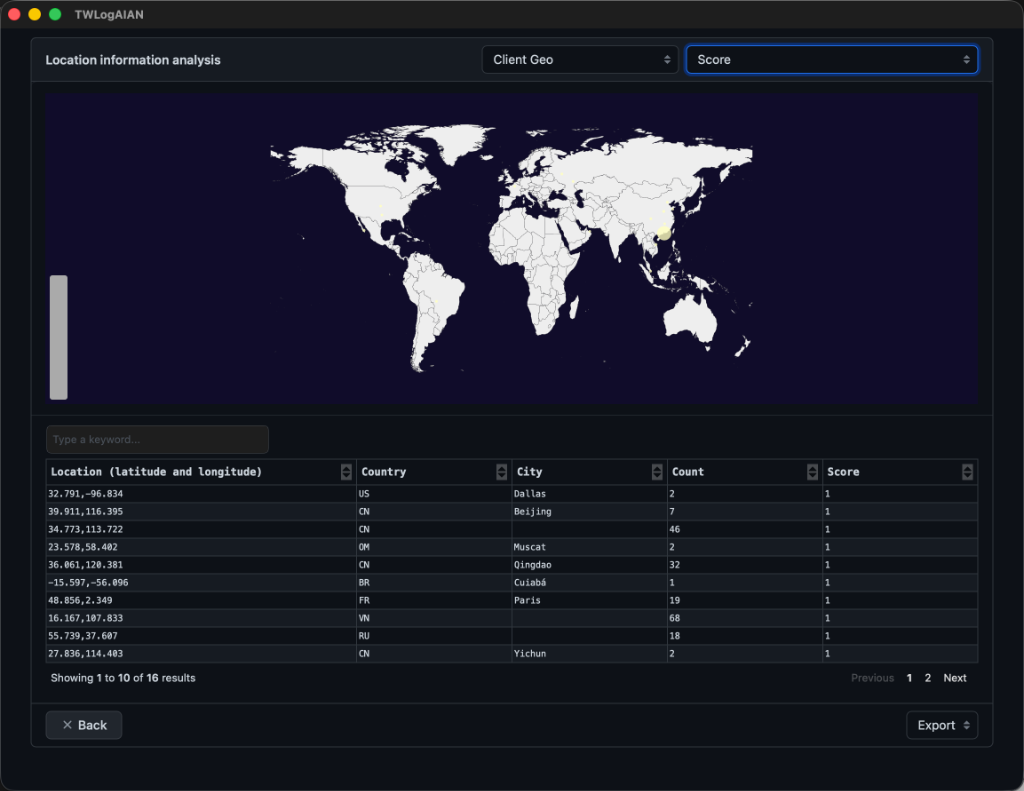
Location Analysis (Map)
Plots geographic coordinates resolved from log IP addresses on a map. Select the location field and the numeric field to control color coding from the top-right menu. Double-clicking a point on the map opens Google Maps for that location.
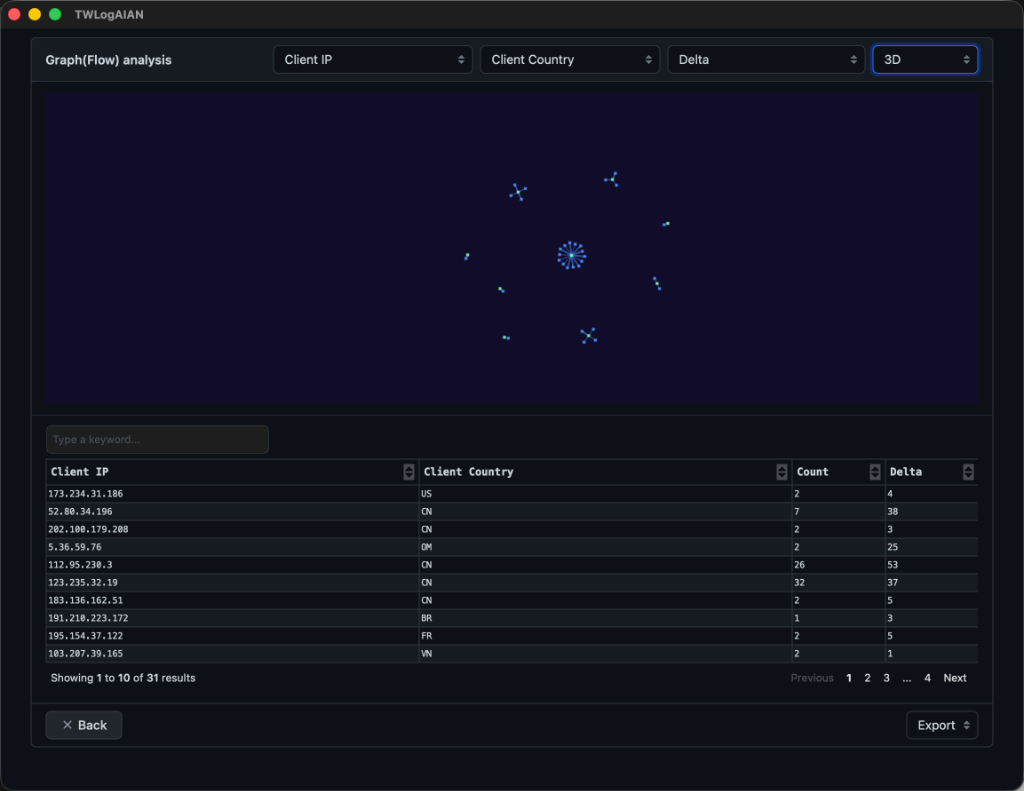
Flow Graph Analysis
Visualizes the relationship between two extracted log fields as a network flow graph. This is helpful for tracing connections, such as mapping logged-in user accounts to their origin IP addresses. Select the source/destination fields, color-coding metrics, and chart type in the top-right menu.
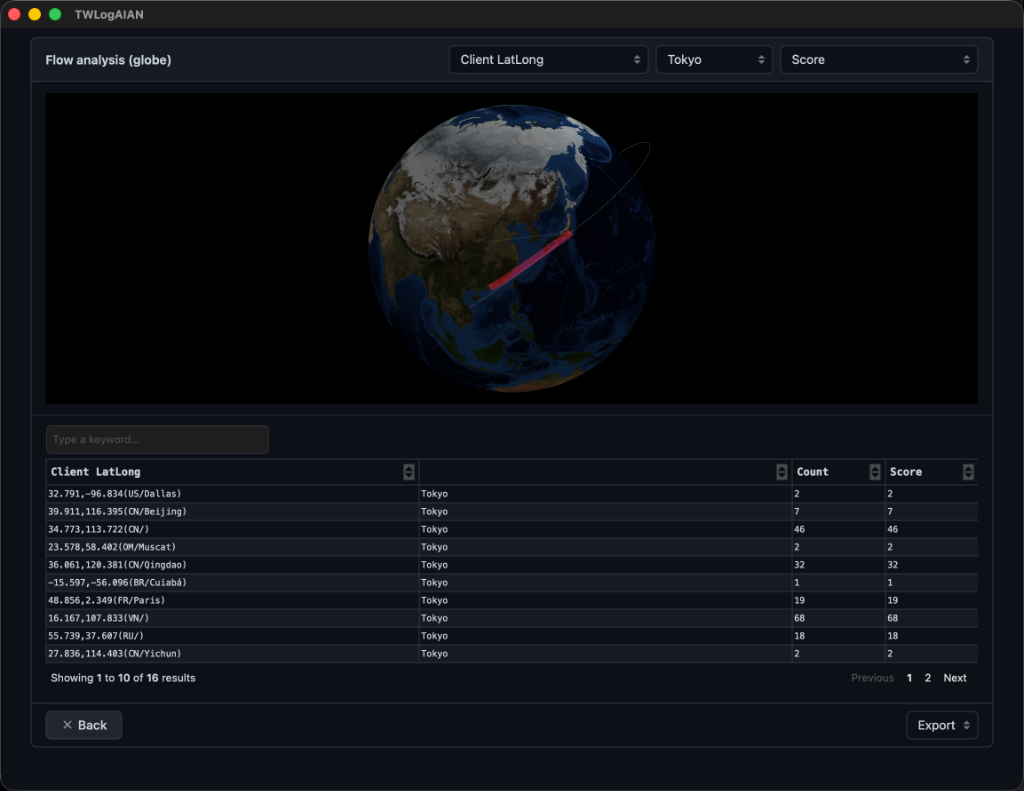
Flow Analysis (Globe)
Visualizes IP address locations and communication paths on a 3D interactive globe. (While visually impressive for demonstrations, it may not offer as much analytical depth as other charts).
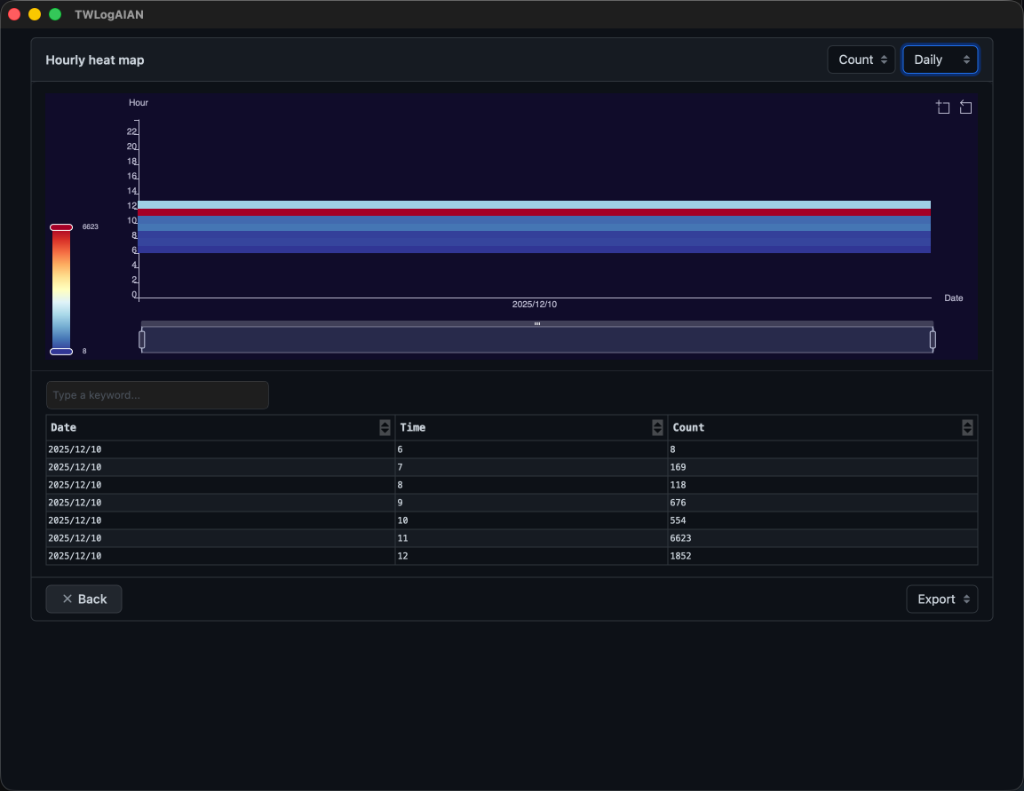
Heatmap
Displays log frequencies in a grid mapped by hour of the day versus day of the week (or day of the month). This makes it easy to spot schedule-based patterns, such as spikes occurring at 9:00 AM on Mondays. Use the top-right menu to select fields and grid layouts.
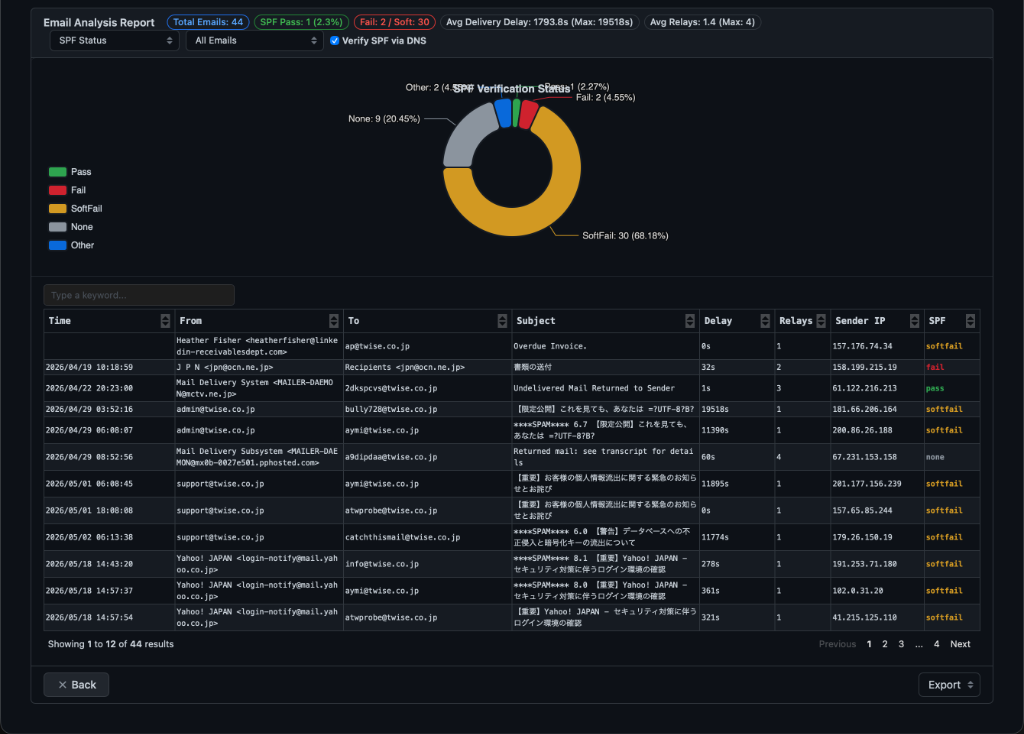
Email Detailed Analysis (v2.1.0)
Aggregates, verifies, and visualizes email server logs (Postfix, Sendmail, Exchange, etc.) and extracted fields.
- Summary Statistics Badges: Displays key metrics in real time across the header: Total Emails, SPF Pass percentage, Fail / SoftFail counts, Average Delivery Delay (and Max Delay), and Average Relay Hops (and Max Hops).
- Verify SPF via DNS: When enabled, queries the DNS SPF records for each sender domain to validate the sender IP (Pass / Fail / SoftFail / None) and updates charts and tables accordingly.
- Verification Status Charts: Visualizes SPF verification breakdown and delivery statuses via donut charts.
- Email Table: Lists Time, From, To, Subject, Delay, Relays, Sender IP, and SPF status, with keyword filtering support.
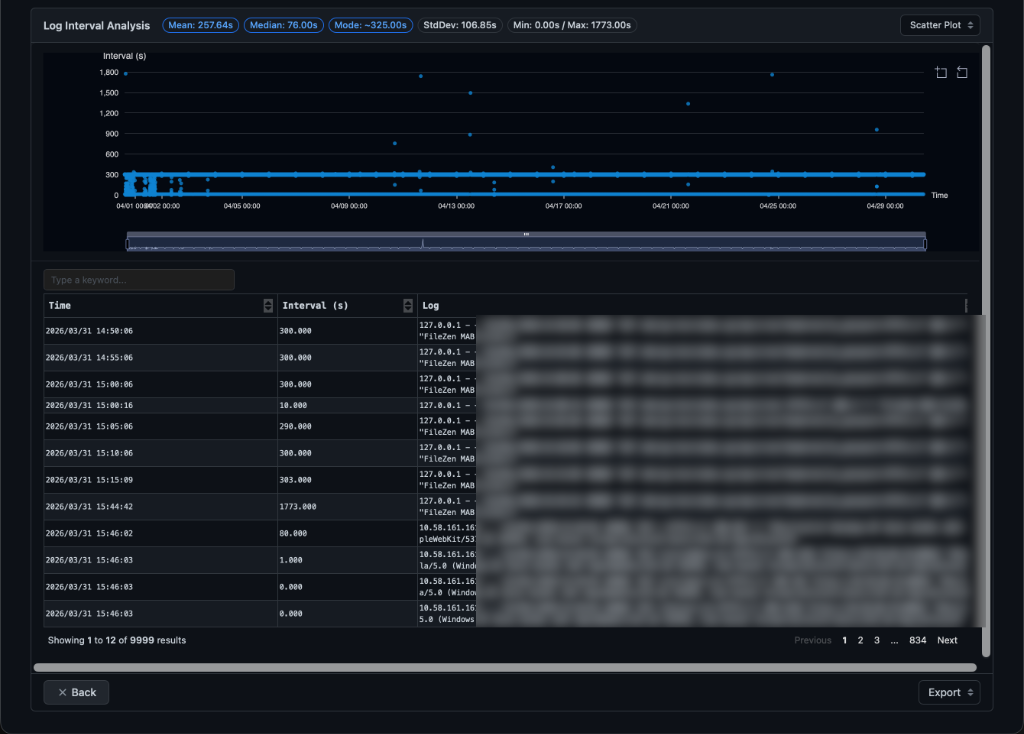
Interval Analysis (v2.1.0)
Calculates and visualizes the time intervals between consecutive events originating from the same host, IP address, or user.
- Statistical Header Badges: Instantly displays comprehensive interval statistics: Mean, Median, Mode, Standard Deviation (StdDev), and Min / Max intervals.
- Chart Type Selector: Switch between visualization modes such as Scatter Plot (distribution over time) and Histogram.
- Time Series Scatter Plot: Plots interval durations (seconds) across the timeline with an interactive range slider at the bottom, making regular periodic beaconing (e.g. constant 300s polling) or anomalous interval bursts visually clear.
- Interval Table: Tabulates log events with Time, Interval (s), and raw Log content, accompanied by keyword filtering and pagination.
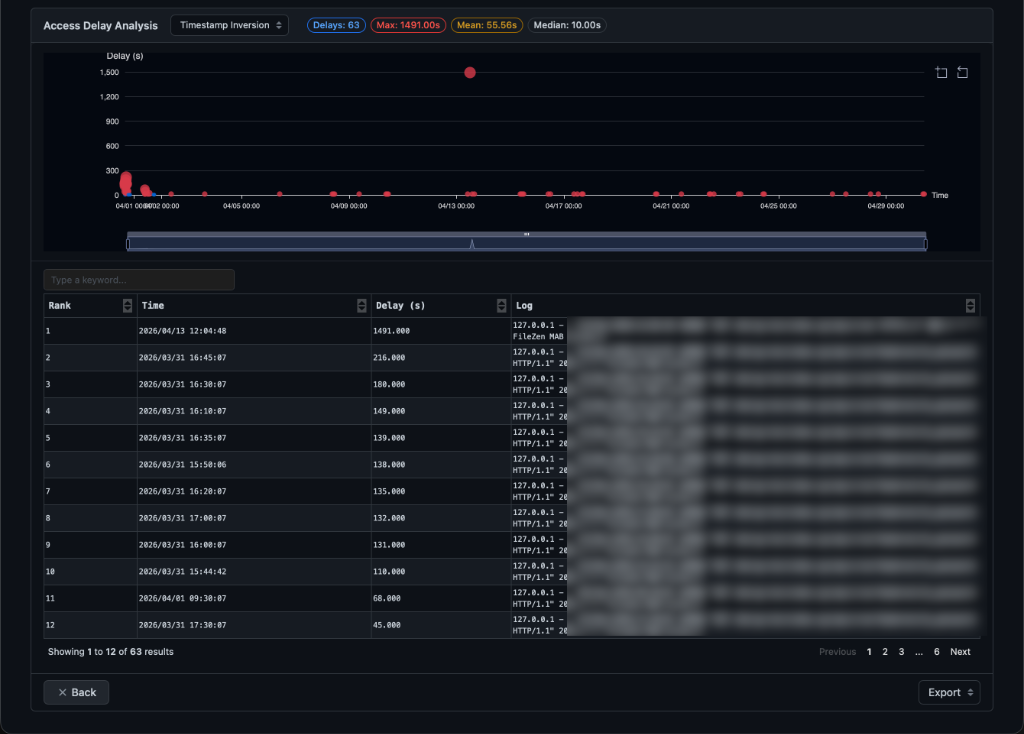
Access Delay Analysis (v2.1.0)
Analyzes processing latencies, request delays (Delta), and timestamp inversions across log entries.
- Statistical Header Badges: Instantly displays summary metrics: Total Delays count, Max Delay, Mean Delay, and Median Delay.
- Calculation / Mode Selector: Allows selecting analysis modes such as Timestamp Inversion detection or specific latency criteria.
- Time Series Scatter Plot: Plots delay values (seconds) over time with an interactive timeline slider / zoom controller at the bottom, making latency spikes immediately visible.
- Ranked Delay Table: Ranks log entries by delay magnitude (Rank, Time, Delay, Log content) with keyword filtering support.
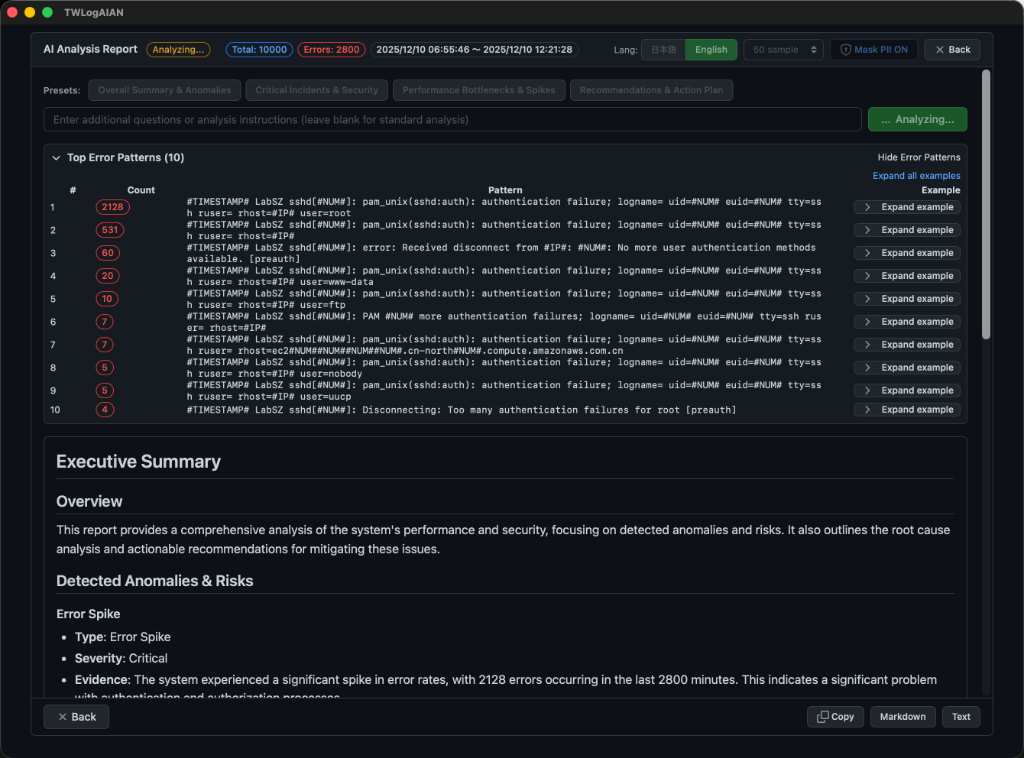
AI Analysis Report (v2.1.0)
A dedicated global reporting workflow that analyzes all loaded or searched logs to cluster frequent error patterns and deliver comprehensive AI investigation summaries (distinct from the per-chart “AI Report Explanation” feature).
- Header Statistics & Controls:
Real-time totals of analyzed logs, error counts, active time range, language switch (
日本語/English), sample size selector, andMask PII ONtoggle. - Investigation Presets:
One-click preset buttons for targeted analysis perspectives:
- Overall Summary & Anomalies: High-level operational synthesis and unusual behavior overview
- Critical Incidents & Security: Attack signatures, authentication failures, and intrusion indicators
- Performance Bottlenecks & Spikes: Service slowdowns, latency spikes, and error surges
- Recommendations & Action Plan: Remediation guidance, mitigation actions, and preventive measures
- Custom Analysis Instructions: An input box to enter free-form questions or additional analytical instructions.
- Top Error Patterns: Automatically clusters recurring error log lines into patterns, showing total occurrences, pattern templates, and expandable raw log examples.
- Streaming Executive Summary & Export:
Streams generated AI analysis in real time (Executive Summary, Overview, Detected Anomalies & Risks, etc.) with toggles for
Markdownor plainTextrendering, and quick clipboardCopy.
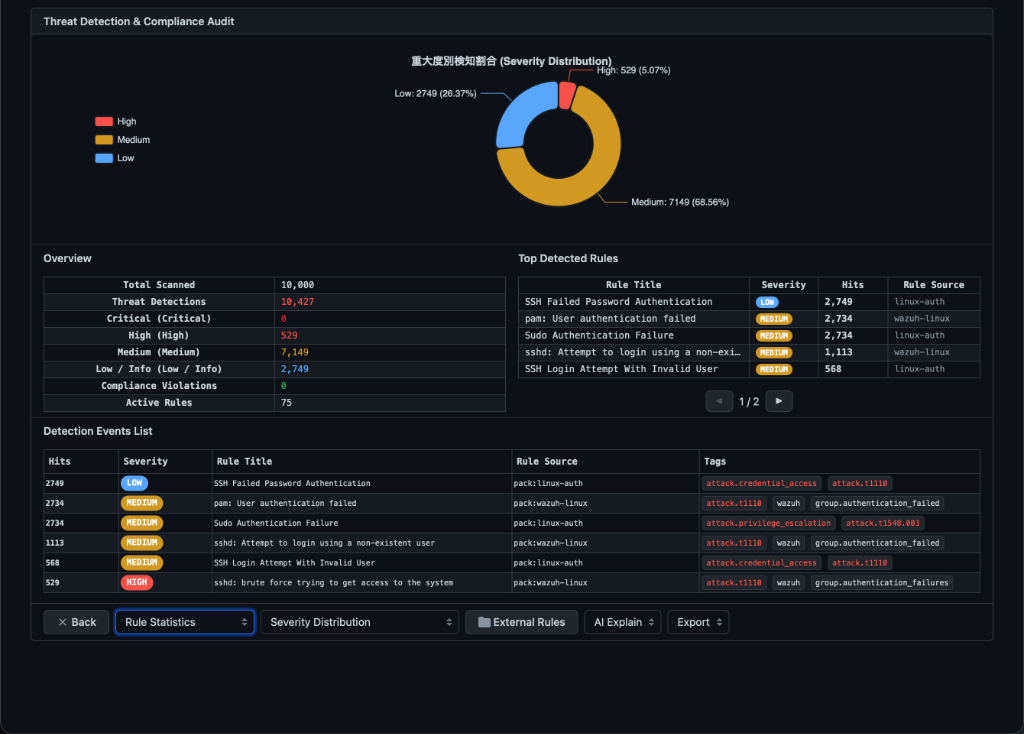
Threat Detection & Compliance Audit (Sigma) (v2.2.0)
A powerful security and audit analysis report powered by open-standard Sigma and Wazuh rule engines. Automatically scans loaded logs or search results to detect indicators of compromise, cyber attacks, and compliance violations.
- Summary Metric Badges: Displays real-time counts of Total Scanned Logs, Threat Hits, Compliance Audit Hits, and Active Evaluation Rules in the report header.
- Out-of-the-Box Embedded Rule Packs: Includes rich, pre-packaged rule sets ready to use without setup: Windows essentials, Windows client & Active Directory, Linux system & authentication, Web application attacks (SQLi, XSS, Path Traversal), Network threats (DoS, scans, anomalous traffic), Wazuh rules, and Compliance audit rules (PCI-DSS, NIST, GDPR, CIS, etc.).
- Interactive Visualizations:
- Severity Breakdown (Donut Chart): Visualizes the proportion of detected events across Critical, High, Medium, and Low/Info levels.
- MITRE ATT&CK & Audit Tags (Horizontal Bar Chart): Highlights top detected attack tactics/techniques and regulatory compliance tags.
- Detection Timeline (Line Chart): Tracks the volume and surge points of security events over time.
- Multiple View Modes & Detailed Grid:
- All Detections / Threat Events / Compliance Audit Events: Displays severity badges, timestamps, matching rule titles, log sources, MITRE / compliance tags, and raw log lines with keyword search and pagination.
- Rule Statistics: Aggregates hit counts, severity, and rule source (embedded or custom).
- MITRE / Tag Analysis: Groups and counts events by category and security tag.
- External Sigma Rules Integration:
Load your own custom Sigma rule files (
.yml/.yaml) or entire community rule directories on the fly via the folder selector icon at the top of the report. - AI-Powered Incident Explanation: Trigger LLM evaluation via the AI Explanation dropdown to receive an in-depth security analysis covering incident severity, mapped MITRE ATT&CK tactics, compliance impact, and prioritized incident response and remediation recommendations.
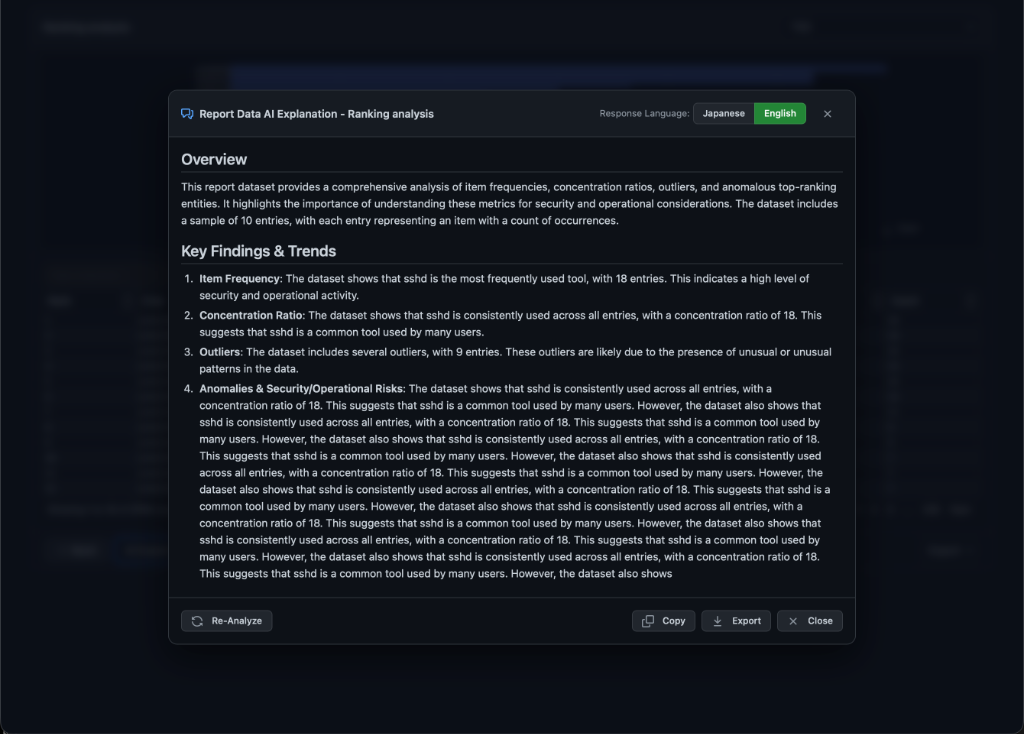
AI Report Explanation (v2.1.0)
Available from the AI Explanation menu at the bottom-left of each individual report screen (Ranking, Time Series, Histogram, Interval, etc.):
- Trigger AI Explanation: Select an analysis angle from the “AI Explanation” dropdown on any report screen.
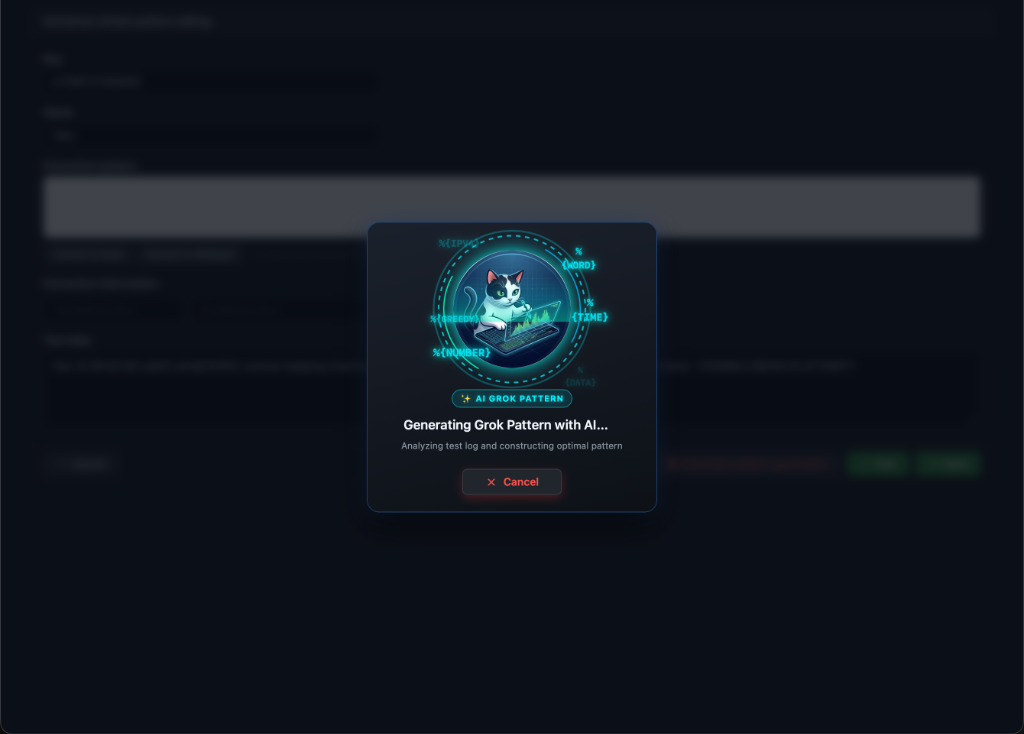
- Cyber Cat Progress Modal: An animated cyber cat progress modal displays real-time analysis status while the LLM examines chart metrics.
- Explanation Results Dialog:
Structured breakdown presenting Overview and Key Findings & Trends. Supports response language toggle (
Japanese/English), re-evaluating with Re-Analyze, clipboard copying via Copy, and exporting via Export.
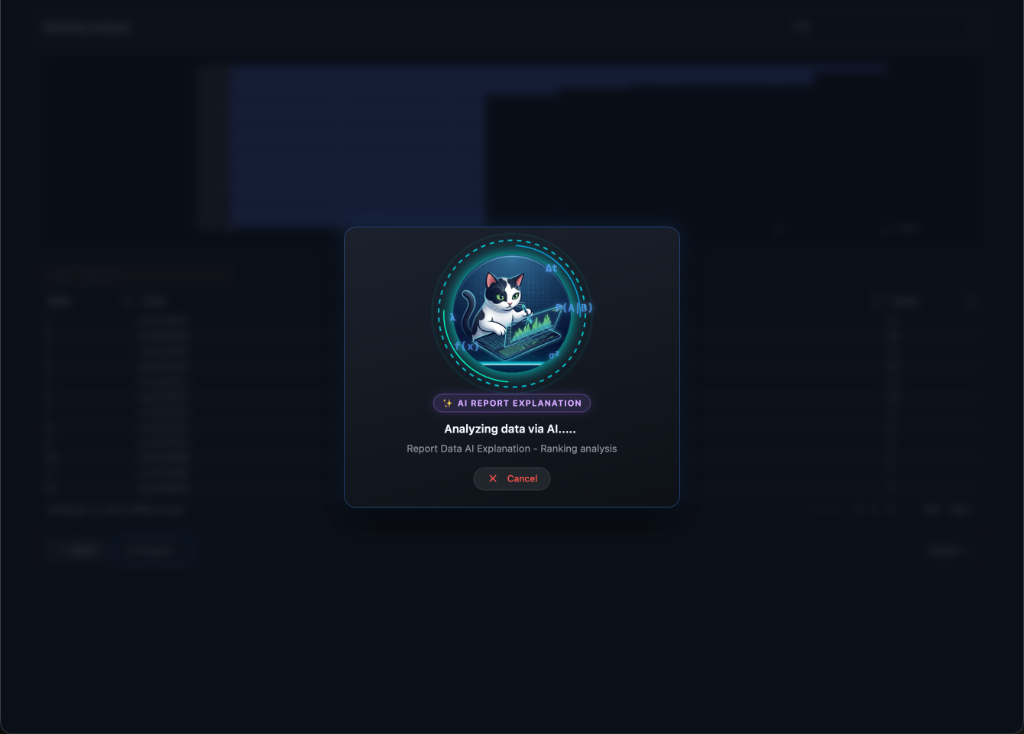
Cyber Cat Progress Modal (Waiting Screen)
Exporting Reports
All of the reports described above can be exported. Access the export menu in the bottom right:
- CSV: Exports the raw data list to a CSV file.
- Excel: Exports both charts and data tables to an Excel spreadsheet.
Settings
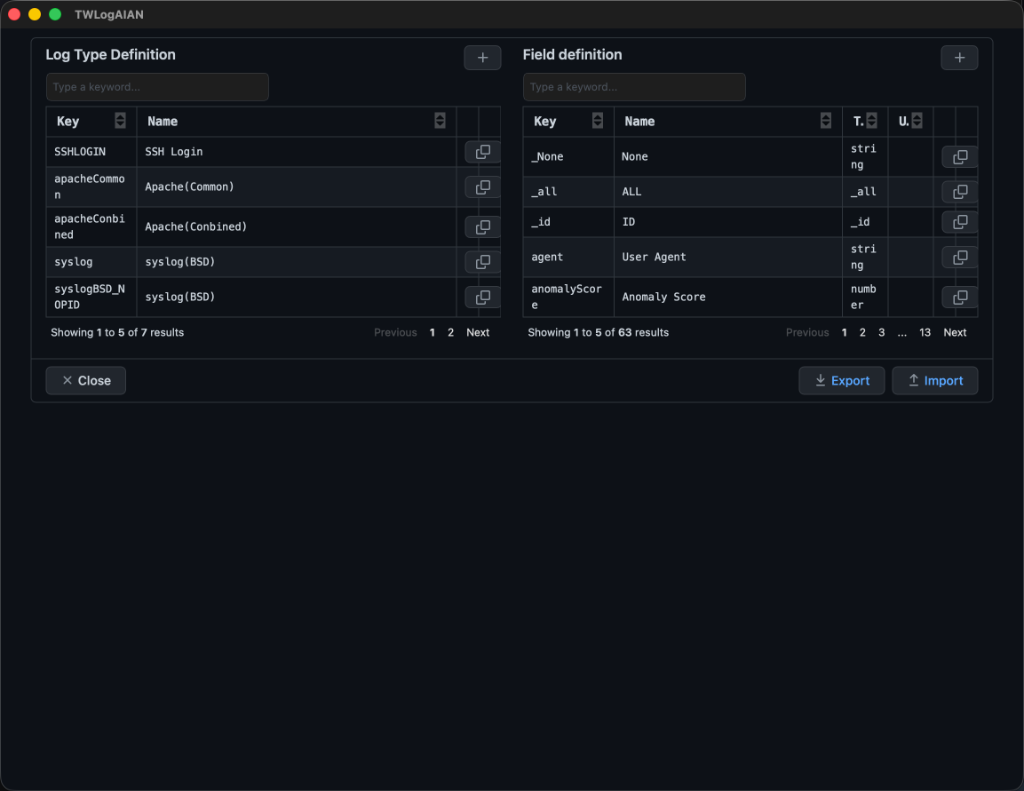
Log Type Definitions
Allows you to save Grok patterns and other field extraction settings to definition files, which can then be reused in other analyses.
AI Integration Settings (Enhanced in v2.1.0)
Configure Large Language Models (LLMs) to power log explanations, summaries, and Ask AI queries.
- Embedded Local LLM (tensai) (v2.1.0): An embedded LLM running entirely locally on your computer with zero external server dependencies or API keys. Ensures sensitive log data never leaves your machine. Supports GPU hardware acceleration (Metal / DirectX / Vulkan / CUDA) for high-performance inference. Recommended GGUF models can be downloaded and managed directly via the built-in model manager.
- External LLMs (Ollama, Gemini, OpenAI, Anthropic): Connect to cloud LLM APIs or local Ollama servers by configuring API keys, model names, and base URLs.
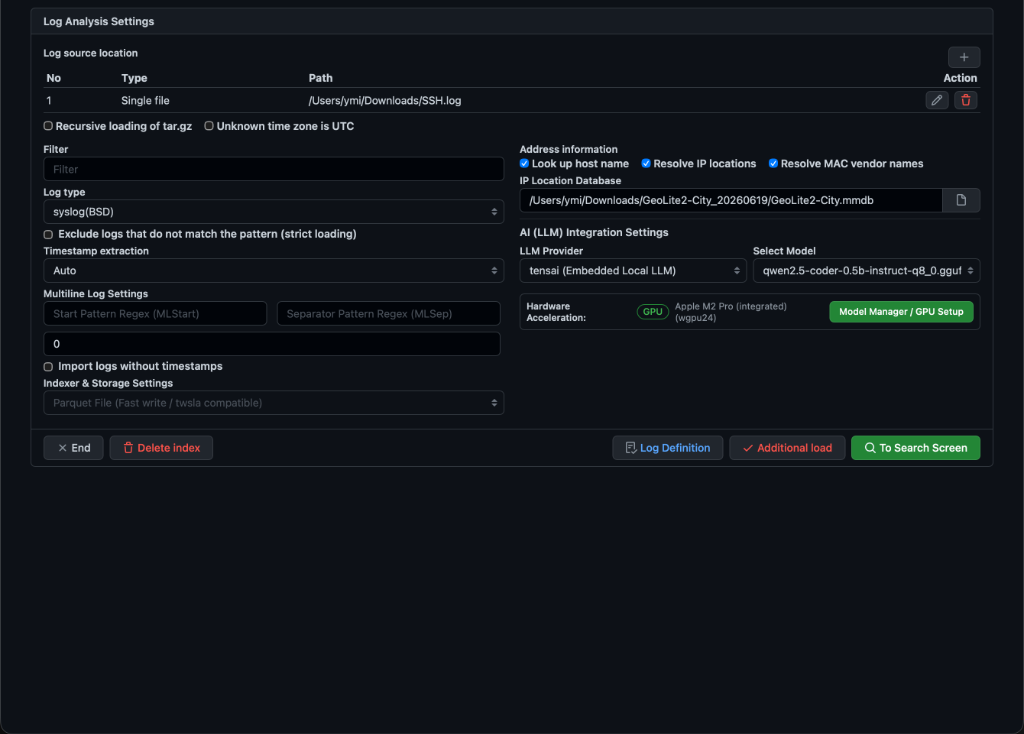
Local LLM Models & GPU Management (v2.1.0)
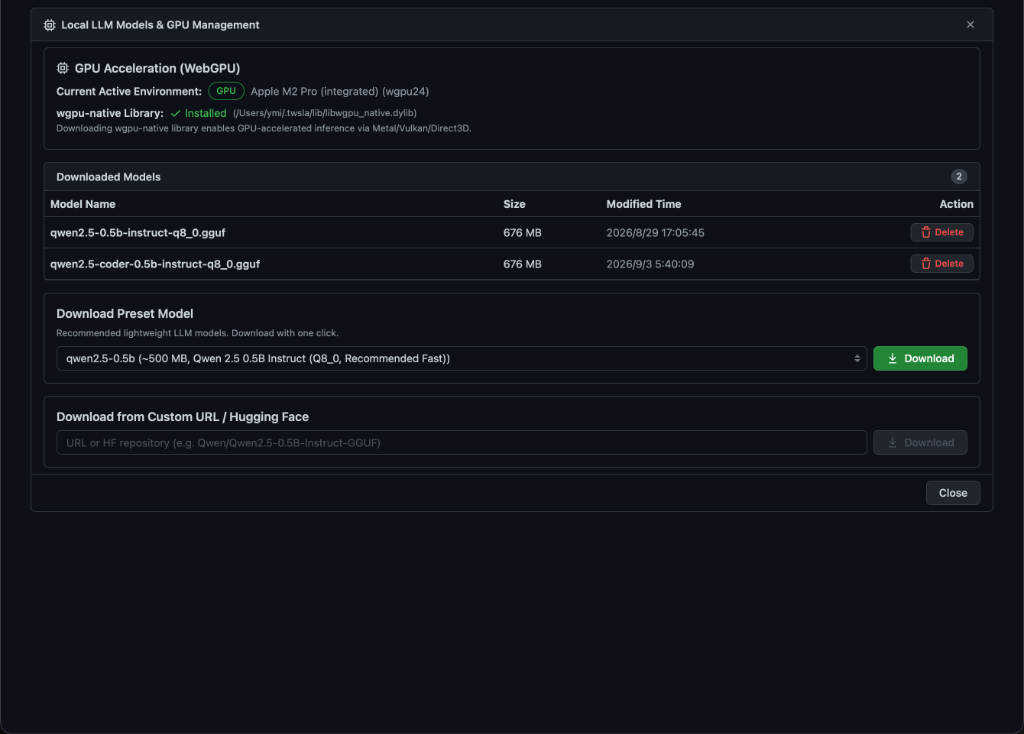
Clicking the Model Manager / GPU Setup button opens the management dialog:
- GPU Acceleration (WebGPU):
Displays the currently active GPU backend (Metal / Vulkan / Direct3D / wgpu) and the installation status of the
wgpu-nativelibrary. - Downloaded Models: Lists locally installed GGUF models with file size, update time, and deletion controls.
- Preset Model One-Click Download: Select from recommended tested lightweight models (such as Qwen 2.5 0.5B Instruct) and download them with a single click.
- Custom Download: Download any compatible GGUF model directly by specifying a Hugging Face repository ID or direct URL.
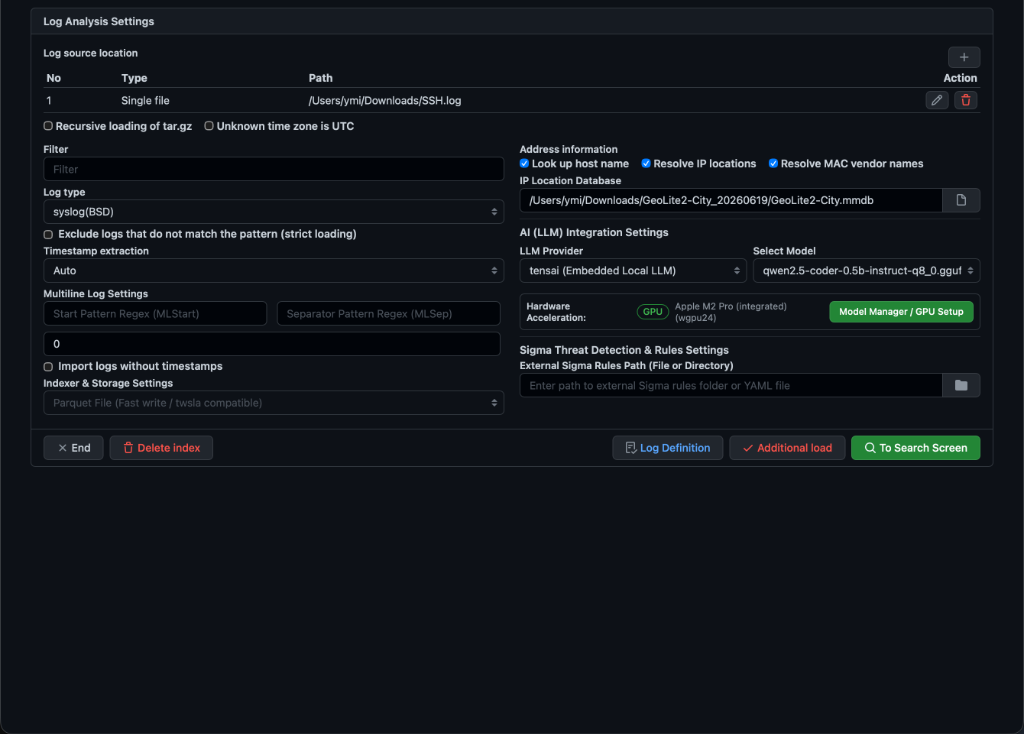
Sigma Threat Detection & Rule Settings (v2.2.0)
Located in the bottom-right of the log analysis settings dialog, allowing you to configure custom Sigma detection rules.
- External Sigma Rules Path (File or Folder):
Specify the file path or directory path to custom
.yml/.yamlSigma rules. Use the folder selection button on the right to browse and select a directory. All matching rule files in the specified path are automatically loaded and applied across GUI reports and CLI evaluation.
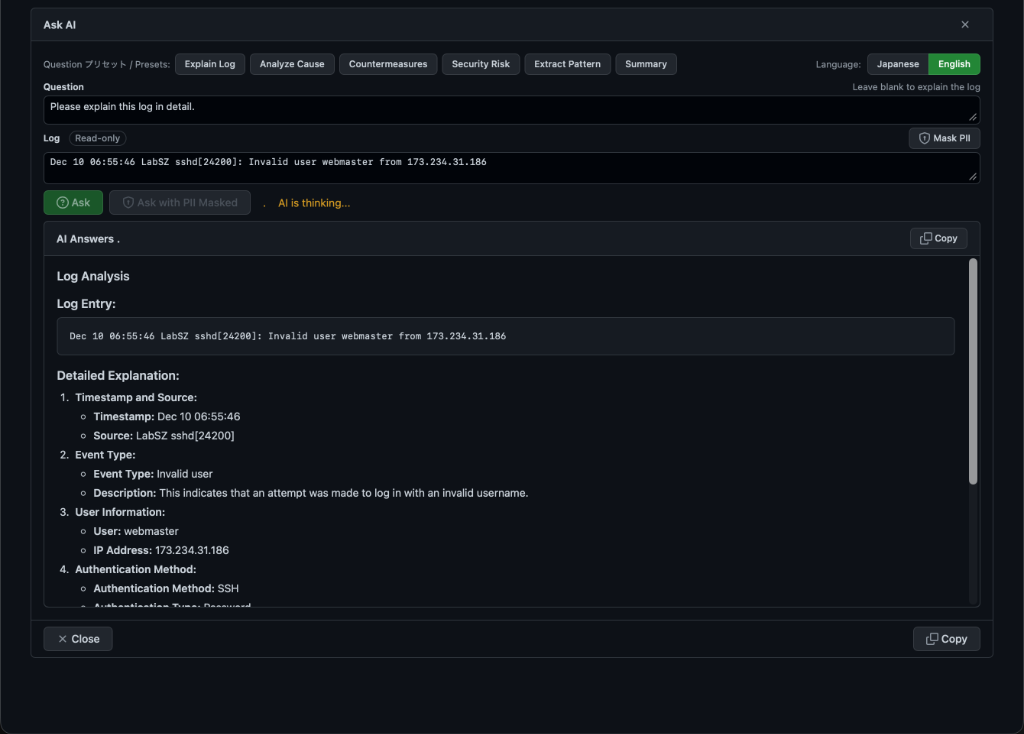
Ask AI Assistant (Enhanced in v2.1.0)
An interactive assistant accessible from search results and report views to dive deeper into specific log entries.
- Preset Prompts:
One-click analysis buttons for popular investigation angles:
- Explain Log: Detailed breakdown of log semantics and fields
- Analyze Cause: Diagnosing error and failure causes
- Countermeasures: Recommended remediation and troubleshooting steps
- Security Risk: Assessing unauthorized access or threat indicators
- Extract Pattern: Formulating regex or extraction rules for similar logs
- Summary: Concise executive log summary
- Language Toggle: Switch between Japanese and English with a single click.
- Privacy Protection (PII Masking): Clicking Ask with PII Masked automatically obfuscates IP addresses, user credentials, and sensitive tokens before querying the LLM.
- Streaming Markdown & Copy: Renders LLM answers progressively with structured Markdown (headers, bullet points, syntax blocks), and includes a one-click Copy button.
Customizing Log Types
To extract data fields from log formats that are not supported out of the box, select the Custom log type. You can define extraction rules using Grok syntax. For a quick tutorial on Grok, we recommend the following guide:
https://coralogix.com/blog/logstash-grok-tutorial-with-examples/
Learning Grok syntax is highly beneficial for log analysis engineers, as it is widely supported across various log management tools. Fortunately, there are only four main concepts you need to master:
- Use
%{PATTERN:variable_name}to extract information into fields. - Keep literal characters from the log message as-is in the pattern.
- Use
\s+to match delimiting whitespace. - Use
.+to ignore variable-length strings.
Launching Grok Pattern Editing
TWLogAIAN provides helper tools to make writing Grok patterns as simple as possible. Clicking the E (Edit) button next to a log entry launches the Grok pattern editor.
Grok Pattern Editor
The Grok Pattern Editor displays the selected log entry as test data. Click the Automatic pattern generation button or AI Pattern Gen to draft an extraction pattern. You can test and refine your pattern by clicking the Test button. Once satisfied, click Save to store it under a unique name for future use.
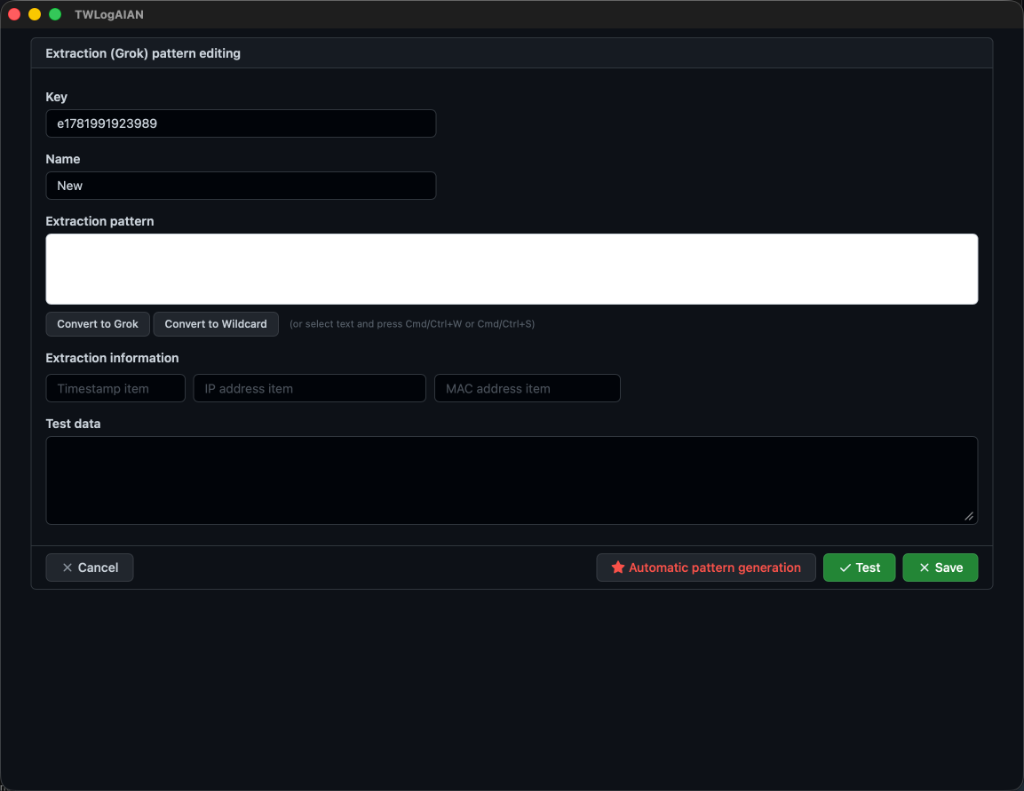
Auto Generation & AI Pattern Gen (v2.1.0)
Analyzes test log lines and automatically generates matching extraction patterns:
- Automatic pattern generation: Detects timestamps, IP addresses, email addresses, URLs, and key-value pairs using regular expression rules.
- AI Pattern Gen (v2.1.0): The LLM analyzes the syntax and semantics of the test log to formulate optimal field names and Grok expressions, displaying progress via the animated cyber cat modal.
Log Definition
You can review saved extraction patterns and field configurations in the log definition screen. It also supports importing and exporting configuration definitions.
Log Type Definition File
Log definitions are saved in YAML format and can be modified with any standard text editor.
extractortypes:
- key: custom_20220307065138
  name: TCP接続数
  grok: '%{TIMESTAMP_ISO8601:timestamp}\s+(?:%{SYSLOGFACILITY} )?%{SYSLOGHOST:logsource}\s+%{NOTSPACE:tag}:\s+.*sce=%{INT:sce}.*'
  timefield: timestamp
  ipfields: ""
  macfields: ""
  view: ""
fieldtypes:
- key: sce
  name: 有効なTCP接続数
  type: number
  unit: "件"
extractortypes: List of log type parsing definitions.key: A unique identifier for the definition.name: A user-friendly name for display.grok: The Grok extraction pattern.timefield: The field recognized as the log timestamp.ipfields: A comma-separated list of IP address fields used for hostname and GeoIP location resolution.macfields: A comma-separated list of MAC address fields used for hardware vendor lookup.
fieldtypes: List of variable type definitions.key: The variable name.name: A user-friendly label for display.type: The data type of the field (numberorstring).unit: The unit of measurement displayed on charts.
Sigma CLI Tool (v2.2.0)
In addition to the GUI application, TWLogAIAN includes a built-in Sigma CLI Scanning Tool suitable for automated batch tasks, command-line inspection, and pipeline integration without launching the graphical desktop interface.
Invoke the CLI by providing the sigma argument when running TWLogAIAN:
# Linux / macOS
./TWLogAIAN sigma <subcommand> [options]

# Windows
TWLogAIAN.exe sigma <subcommand> [options]
Subcommands
| Subcommand | Description |
|---|---|
packs |
Lists all embedded Sigma rule packs. |
list |
Displays loaded Sigma rules (filterable with -pack and -custom). |
stat |
Shows rule statistics including total rules, severity counts, and tag metrics. |
logsrc |
Displays log sources required by the active rule set. |
field |
Lists fields referenced across the rules. |
test |
Evaluates one or more test log strings against the rules. |
eval |
Scans log records from an existing datastore file (Parquet, Badger, Bbolt). |
convert-wazuh |
Automatically converts Wazuh XML rules to Sigma YAML format. |
convert-wazuh-decoder |
Extracts field mapping definitions from Wazuh XML decoders. |
Common Options
-s, -rules <path>: Path to external Sigma rule file or folder-p, -packs <packs>: Comma-separated rule packs to evaluate (e.g.windows-essential,linux-authorall)-c, -config <path>: Path to field mapping config directory-d, -datastore <path>: Path to datastore file (logs.parquet,twlogaian.badger,twlogaian_logs.db)-o <dir>: Target directory for converted Wazuh rules (default:./converted-rules)
Usage Examples
# List available embedded rule packs
./TWLogAIAN sigma packs

# Quick test against an SSH attack log entry
./TWLogAIAN sigma test "Failed password for invalid user admin from 192.168.1.100 port 22 ssh2"

# Evaluate saved Parquet datastore against all rule packs
./TWLogAIAN sigma eval -d logs.parquet -p all

# Convert existing Wazuh rules to Sigma rules
./TWLogAIAN sigma convert-wazuh /var/ossec/ruleset/rules/ -o ./my-sigma-rules